
There’s an unwritten rule of Super Bowl hosting: the snack table can make or break your party. And sitting at the throne of game day appetizers—year after year—is the mighty buffalo chicken dip. It’s creamy, it’s spicy, it’s tangy, and it disappears faster than a fourth-quarter lead.
But here’s the thing: not all buffalo chicken dips are created equal. The classic version is legendary for a reason, but why stop there? Whether you’re feeding die-hard wing purists, health-conscious friends, plant-based eaters, or adventurous foodies who want their taste buds challenged, this collection has you covered.
Below you’ll find 10 crowd-tested recipes ranging from the timeless classic to creative mashups that’ll have your guests asking for the recipe before halftime. Each recipe includes complete ingredients, detailed step-by-step instructions, and insider tips to guarantee success. Let’s get cooking.
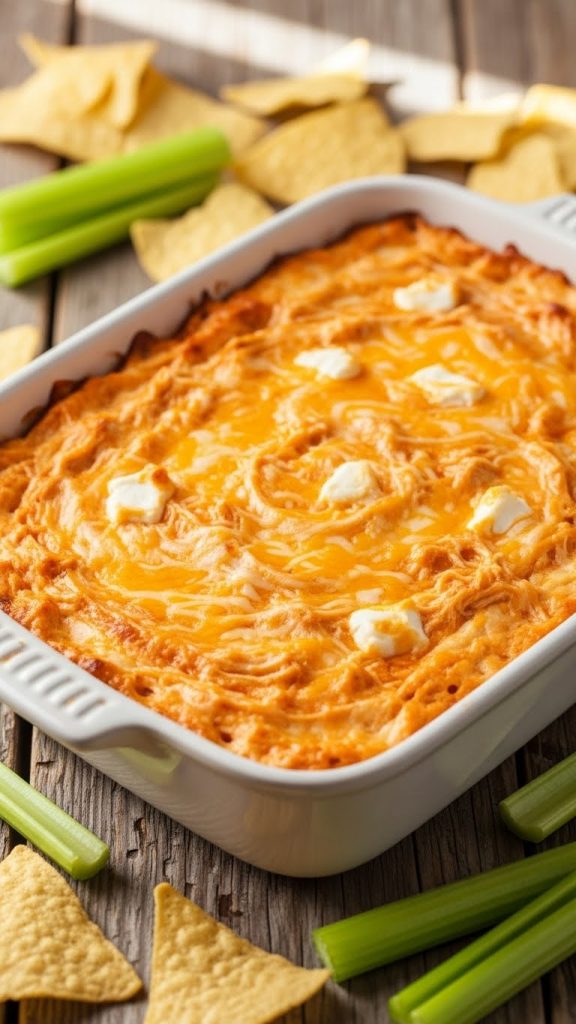
1. Classic Creamy Buffalo Chicken Dip
This is the gold standard—the recipe that started it all. If you’ve never made buffalo chicken dip before, start here. It’s foolproof, universally loved, and delivers that perfect balance of heat, creaminess, and savory chicken flavor that defines the dish.
Prep Time: 15 minutes | Cook Time: 25 minutes | Serves: 10-12
Ingredients
- 2 cups shredded cooked chicken (rotisserie works perfectly)
- 8 oz cream cheese, softened to room temperature
- ½ cup Frank’s RedHot sauce (or your preferred hot sauce)
- ½ cup ranch dressing
- 1 cup shredded sharp cheddar cheese, divided
- 2 green onions, thinly sliced (for garnish)
- Tortilla chips, celery sticks, and carrot sticks for serving
Step-by-Step Instructions
- Preheat your oven and prepare the baking dish. Set your oven to 350°F (175°C) and position the rack in the center. Lightly grease a 9-inch baking dish, pie plate, or cast iron skillet with cooking spray or a small amount of butter. A cast iron skillet is ideal because it retains heat and keeps the dip warm longer during serving.
- Prepare the cream cheese base. Place the softened cream cheese in a large mixing bowl. Using a hand mixer on medium speed or a sturdy spatula, beat the cream cheese for about 1 minute until it becomes smooth and fluffy with no lumps. If your cream cheese is still cold, microwave it in 15-second intervals until pliable but not melted.
- Add the wet ingredients. Pour the hot sauce and ranch dressing into the bowl with the cream cheese. Beat on medium speed for 1-2 minutes until the mixture is completely uniform in color—you should see no white streaks of cream cheese. Scrape down the sides of the bowl with a spatula to ensure everything is incorporated.
- Fold in the chicken and cheese. Add the shredded chicken to the bowl along with ½ cup of the shredded cheddar cheese (reserve the other half for topping). Using a spatula or wooden spoon, fold the ingredients together until the chicken is evenly distributed throughout the creamy mixture. Be thorough—you want every bite to have chicken in it.
- Transfer to the baking dish. Scoop the buffalo chicken mixture into your prepared baking dish. Use the back of the spatula to spread it into an even layer, pressing gently to eliminate any air pockets. The dip should be roughly 1 to 1.5 inches thick for even heating.
- Add the cheese topping. Sprinkle the remaining ½ cup of shredded cheddar cheese evenly over the top of the dip. Make sure to cover the edges as well as the center—the cheese on the edges will get slightly crispy, which adds a delicious texture contrast.
- Bake until bubbly and golden. Place the baking dish on the center rack of your preheated oven. Bake uncovered for 20-25 minutes. You’ll know it’s ready when the edges are actively bubbling, the cheese on top is fully melted with light golden spots, and the center is heated through. If the top isn’t browning but the edges are bubbling, switch to broil for the last 1-2 minutes (watch carefully to prevent burning).
- Rest and garnish. Remove the dip from the oven and let it rest for 5 minutes—this allows it to set slightly and prevents burns from molten cheese. Scatter the sliced green onions over the top for color and a mild onion flavor.
- Serve immediately with dippers. Arrange tortilla chips, celery sticks, and carrot sticks around the dish or in separate bowls nearby. Serve while hot—buffalo chicken dip is at its best when warm and gooey. If serving over an extended period, use a warming tray or place on a trivet over a small tea light candle.
Pro Tips
- For extra-smooth texture, use a food processor to blend the cream cheese, hot sauce, and ranch before adding the chicken.
- Want more heat? Increase hot sauce to ¾ cup or add ¼ teaspoon cayenne pepper to the mixture.
- This dip can be assembled up to 24 hours ahead—cover tightly and refrigerate, then add 5-10 minutes to baking time.
- If using homemade shredded chicken, season it lightly with salt and pepper before adding to the dip.
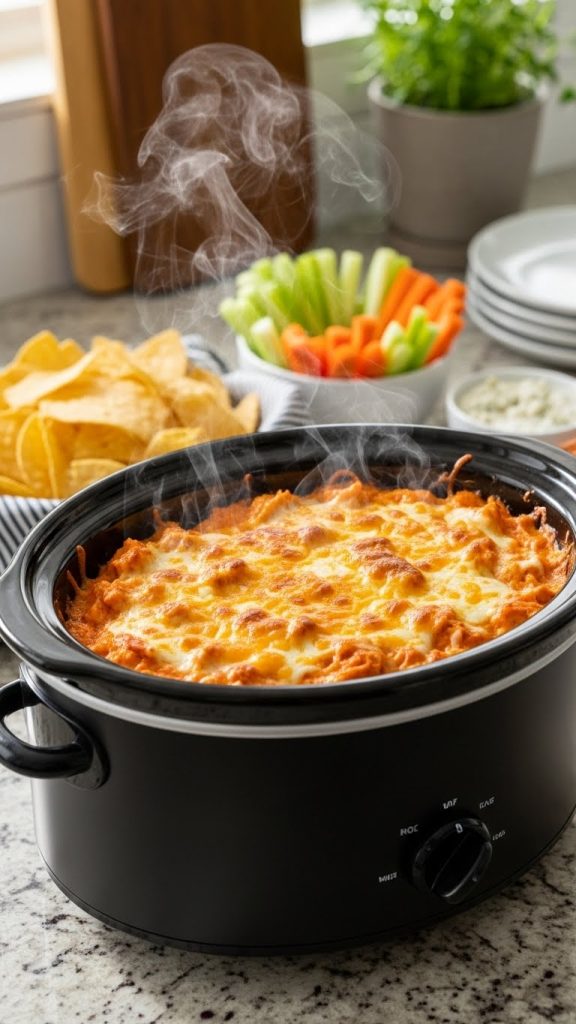
2. Slow Cooker Buffalo Chicken Dip
Game day is hectic. Between decorating, organizing the drink station, and making sure you actually get to watch the game, the last thing you need is to babysit an appetizer. Enter the slow cooker version—dump, set, forget, and return to bubbling perfection. Plus, it stays warm throughout the entire party.
Prep Time: 10 minutes | Cook Time: 2-5 hours | Serves: 12-14
Ingredients
- 1.5 lbs boneless skinless chicken breasts (about 3 medium breasts)
- 8 oz cream cheese, cut into 1-inch cubes
- ½ cup buffalo wing sauce
- ½ cup blue cheese dressing (or ranch if preferred)
- 1 cup shredded mozzarella cheese, divided
- ¼ teaspoon garlic powder
- ¼ teaspoon onion powder
- Pinch of salt and black pepper
Step-by-Step Instructions
- Prepare the slow cooker. Lightly spray the inside of a 4-6 quart slow cooker with non-stick cooking spray. This prevents the chicken from sticking to the bottom during the long cooking process and makes cleanup easier.
- Add the chicken and season. Place the raw chicken breasts in a single layer on the bottom of the slow cooker. Sprinkle the garlic powder, onion powder, salt, and pepper evenly over the chicken. These seasonings will infuse into the meat as it cooks.
- Pour the buffalo sauce over the chicken. Pour all of the buffalo wing sauce directly over the chicken breasts, making sure each piece is well coated. The chicken will cook in this sauce, absorbing all that spicy, tangy flavor from the inside out.
- Set the cooking time. Cover the slow cooker with its lid and cook on LOW for 4-5 hours or on HIGH for 2-3 hours. The chicken is ready when it reaches an internal temperature of 165°F (74°C) and shreds easily when pressed with a fork. Low and slow yields more tender, juicy results.
- Shred the chicken directly in the slow cooker. Once the chicken is fully cooked, use two forks to shred it right in the slow cooker. Pull the meat apart in opposite directions, working through each breast until all the chicken is in bite-sized shreds. Stir to combine with the buffalo sauce at the bottom.
- Add the cream cheese. Scatter the cubed cream cheese evenly over the shredded chicken. The cubes should be roughly 1-inch pieces so they melt quickly and evenly. Don’t stir yet—let the cream cheese sit on top.
- Add the dressing and half the mozzarella. Pour the blue cheese (or ranch) dressing over the cream cheese cubes. Add ½ cup of the mozzarella cheese. Cover and let heat for 5 minutes to start melting the cream cheese.
- Stir until creamy and combined. Remove the lid and stir everything together vigorously. The cream cheese should melt into the mixture, creating a creamy, cohesive dip. Continue stirring for 2-3 minutes until you no longer see chunks of cream cheese and the texture is smooth throughout.
- Add the cheese topping. Sprinkle the remaining ½ cup of mozzarella cheese over the top of the dip. Cover the slow cooker and cook for an additional 15-20 minutes until this cheese layer is completely melted.
- Switch to warm setting and serve. Turn the slow cooker to the “warm” or “keep warm” setting. Give the dip a gentle stir to incorporate the melted cheese topping. Serve directly from the slow cooker with chips and vegetables. The warm setting will keep the dip at the perfect serving temperature for 2-3 hours.
Pro Tips
- Cutting cream cheese into 1-inch cubes before adding is crucial—large blocks take forever to melt and create lumps.
- Stir the dip every 30-45 minutes while on warm setting to prevent a skin from forming on top.
- For a thicker dip, use only ¼ cup dressing. For a thinner, more scoopable consistency, increase to ¾ cup.
- You can use frozen chicken breasts—just add 1-2 hours to the cooking time on low.
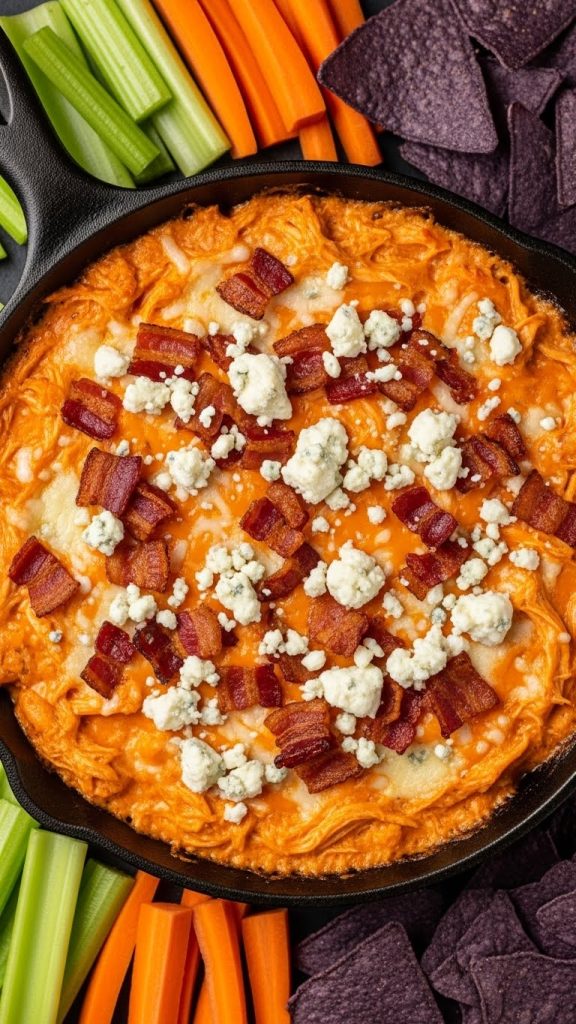
3. Loaded Buffalo Chicken Dip with Bacon & Blue Cheese
For those who believe more is more, this loaded version takes the classic and turns it up to eleven. Crispy bacon adds smoky richness, while blue cheese crumbles bring that authentic buffalo wing experience. This is the dip that gets photographed for Instagram.
Prep Time: 20 minutes | Cook Time: 30 minutes | Serves: 12-14
Ingredients
- 2 cups shredded rotisserie chicken
- 8 oz cream cheese, softened to room temperature
- ½ cup buffalo sauce
- ½ cup sour cream
- 6 strips thick-cut bacon
- ½ cup crumbled blue cheese, divided
- 1 cup shredded Monterey Jack cheese, divided
- 2 tablespoons fresh chives, finely chopped
- Celery sticks and sturdy crackers for serving
Step-by-Step Instructions
- Cook the bacon until extra crispy. Line a baking sheet with aluminum foil and arrange bacon strips in a single layer. Place in a cold oven, then set temperature to 400°F (200°C). Bake for 18-22 minutes until the bacon is deeply browned and crispy—it should shatter when bent. This cold-start method renders fat slowly for maximum crispiness. Transfer to a paper towel-lined plate.
- Crumble the bacon into pieces. Once the bacon has cooled for 3-4 minutes, crumble it into small, bite-sized pieces. You should have about ¾ cup of bacon crumbles. Divide into two portions: ½ cup for mixing into the dip and ¼ cup reserved for topping.
- Reduce oven temperature. Lower the oven temperature to 375°F (190°C). If you didn’t cook bacon in the oven, preheat it now to 375°F. Position a rack in the center of the oven.
- Create the creamy base. In a large mixing bowl, combine the softened cream cheese, buffalo sauce, and sour cream. Using a hand mixer on medium speed, beat for 2-3 minutes until the mixture is completely smooth with no lumps. The sour cream creates a tangier, lighter base than using only cream cheese. Scrape down the sides of the bowl as needed.
- Fold in the chicken, bacon, and cheeses. Add the shredded chicken, ½ cup of bacon crumbles, ¼ cup of the blue cheese crumbles, and ½ cup of the Monterey Jack cheese to the bowl. Using a spatula or wooden spoon, fold everything together until evenly distributed throughout the creamy base.
- Transfer to the baking dish. Spoon the mixture into a 9-inch baking dish or 10-inch cast iron skillet. Use the back of the spatula to spread it into an even layer, making sure to push the mixture into the corners and edges.
- Add the Monterey Jack topping. Sprinkle the remaining ½ cup of Monterey Jack cheese evenly over the top of the dip. This will melt into a golden, bubbly layer during baking.
- Bake until golden and bubbling. Place the baking dish in the oven and bake for 25-30 minutes. The dip is ready when the edges are actively bubbling, the cheese on top is fully melted with golden-brown spots, and the center is heated through (insert a knife in the center—it should come out hot).
- Add the final toppings immediately. Remove the dip from the oven and immediately scatter the reserved ¼ cup bacon crumbles, remaining ¼ cup blue cheese crumbles, and fresh chives over the hot surface. The residual heat will slightly warm the toppings while they retain their texture.
- Rest briefly and serve. Allow the dip to rest for 3-4 minutes to prevent tongue-scorching bites. Serve hot with celery sticks (for the authentic buffalo wing experience) and sturdy crackers that can handle the loaded dip without breaking.
Pro Tips
- Cook bacon until EXTRA crispy—it softens when added to the hot dip, so starting crispier ensures good final texture.
- Blue cheese haters in your crowd? Serve extra crumbles on the side so people can add their own or skip entirely.
- Save your bacon drippings! A tablespoon mixed into the cream cheese base adds incredible depth of flavor.
- The sour cream makes this version tangier and lighter than cream-cheese-only versions—it’s intentional and delicious.
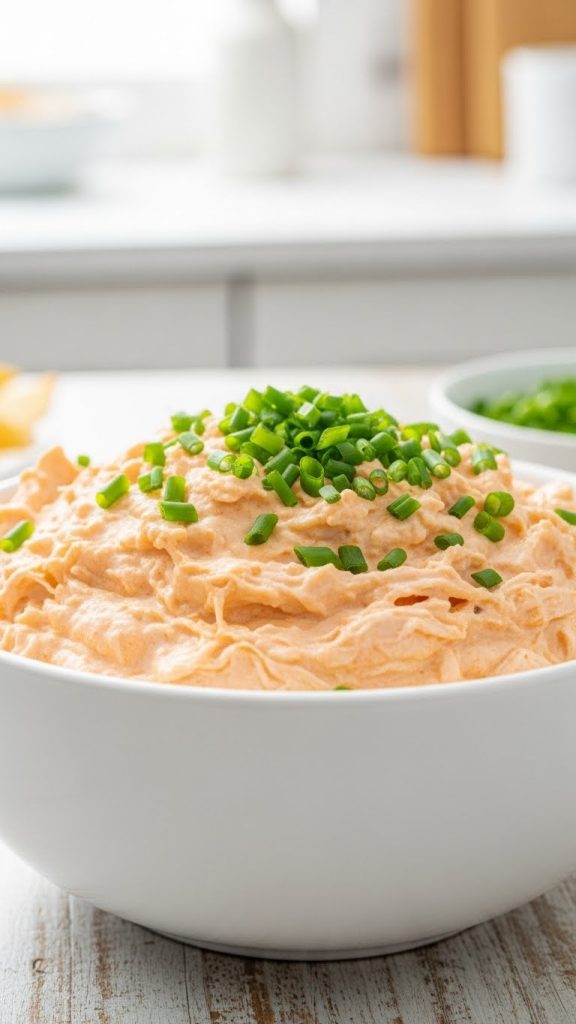
4. Skinny Greek Yogurt Buffalo Chicken Dip
Not everyone wants to dive headfirst into a pool of cream cheese during the big game, and that’s okay. This lightened-up version uses Greek yogurt as the creamy base, slashing calories and fat while maintaining that addictive buffalo flavor. Your health-conscious guests will thank you—and nobody will feel like they’re missing out.
Prep Time: 15 minutes | Cook Time: 25 minutes | Serves: 10-12
Ingredients
- 2 cups shredded chicken breast (poached or rotisserie, skin removed)
- 1 cup plain non-fat Greek yogurt
- 4 oz reduced-fat cream cheese (Neufchâtel), softened
- ½ cup buffalo hot sauce
- ½ cup shredded reduced-fat sharp cheddar cheese
- ¼ teaspoon garlic powder
- ¼ teaspoon onion powder
- ¼ teaspoon smoked paprika
- Salt to taste
- Fresh celery sticks, carrot sticks, and bell pepper strips for serving
Step-by-Step Instructions
- Preheat the oven. Set your oven to 350°F (175°C). Position a rack in the center. Lightly coat an 8-inch or 9-inch baking dish with cooking spray.
- Soften the Neufchâtel cheese properly. Make sure your reduced-fat cream cheese is fully softened—this is even more critical with Neufchâtel as it can be stiffer than regular cream cheese. Leave it at room temperature for 45 minutes, or microwave in 10-second intervals, stirring between each, until pliable.
- Combine the creamy base ingredients. In a large mixing bowl, add the Greek yogurt, softened Neufchâtel cheese, hot sauce, garlic powder, onion powder, and smoked paprika. Using a hand mixer on medium speed or a whisk, beat the mixture for 2-3 minutes until completely smooth and uniform in color. The mixture should be pourable but not runny.
- Taste and adjust seasoning. Greek yogurt is naturally tangy, so taste the base at this point. Add a pinch of salt if needed, or more hot sauce if you want extra heat. The tanginess actually complements the buffalo flavor beautifully.
- Fold in the shredded chicken. Add the shredded chicken to the bowl. Using a spatula, fold it into the creamy base until every piece of chicken is coated and evenly distributed. Make sure to break up any clumps of chicken as you mix.
- Transfer to the baking dish. Pour and scrape the mixture into your prepared baking dish. Use the spatula to spread it into an even layer. The dip should be about 1-1.5 inches deep.
- Add the cheese topping. Sprinkle the reduced-fat cheddar cheese evenly across the top of the dip, covering the entire surface from edge to edge.
- Bake until heated through. Place in the oven and bake for 20-25 minutes. The dip is ready when the cheese is melted and the edges are just starting to bubble. Greek yogurt-based dips don’t bubble as vigorously as cream cheese versions, so watch for melted cheese and hot edges as your indicators.
- Let rest before serving. Remove from the oven and let sit for 5 minutes. This allows the dip to set slightly—Greek yogurt dips can be a bit looser than traditional versions when piping hot.
- Serve with healthy dippers. Keep the healthy theme going by serving with celery sticks, carrot sticks, and colorful bell pepper strips. Whole grain pita chips or baked tortilla chips also work well if you want something heartier.
Pro Tips
- Use 2% Greek yogurt instead of non-fat for extra creaminess without going full-fat—it’s a nice middle ground.
- Don’t skip the smoked paprika—it adds depth that compensates for the reduced richness from using lighter ingredients.
- This version is slightly tangier than traditional dips, which actually pairs wonderfully with the vinegary hot sauce.
- For meal prep, portion into individual ramekins before baking—perfect for single servings with controlled portions.

5. Buffalo Chicken Dip Stuffed Bread Bowl
Presentation matters, and nothing says “I put effort into this party” like a hollowed-out sourdough round filled with bubbling buffalo chicken dip. The bread becomes part of the dish—guests tear off pieces to scoop up the dip, and the crust gets deliciously toasted in the oven. This is a showstopper centerpiece.
Prep Time: 20 minutes | Cook Time: 30 minutes | Serves: 10-14
Ingredients
- 1 large round sourdough bread loaf (8-9 inches diameter)
- 2 cups shredded chicken
- 8 oz cream cheese, softened
- ½ cup buffalo sauce
- ½ cup ranch dressing
- 1½ cups shredded cheddar and Monterey Jack cheese blend, divided
- 3 tablespoons melted butter
- ½ teaspoon garlic powder
- 2 tablespoons fresh parsley, chopped
- Extra crackers or vegetables as backup dippers
Step-by-Step Instructions
- Preheat the oven. Set your oven to 350°F (175°C). Line a large baking sheet with parchment paper or aluminum foil for easy cleanup.
- Cut the top off the bread loaf. Using a large serrated bread knife, cut a circle about 1.5 inches from the edge of the bread loaf, cutting down about 1 inch deep. This creates a “lid.” Set the lid aside—you can toast it alongside the bowl or cut it into cubes for dipping.
- Hollow out the bread bowl. Using your hands, carefully pull out the soft bread from inside the loaf, leaving about a 1-inch thick shell on the bottom and sides. Work carefully to avoid tearing through the crust. The shell needs to be sturdy enough to hold the dip without collapsing.
- Create the bread cubes for dipping. Tear or cut the removed bread interior into roughly 1-inch cubes. You should have about 4-5 cups of bread cubes. Spread them in a single layer on one side of your prepared baking sheet.
- Make the garlic butter. In a small bowl, mix the melted butter with the garlic powder. Using a pastry brush, brush the garlic butter over all the bread cubes, tossing them to coat evenly. Also brush the inside of the bread bowl and around the top edge of the crust.
- Prepare the buffalo chicken filling. In a large bowl, beat together the softened cream cheese, buffalo sauce, and ranch dressing until completely smooth, about 2 minutes with a hand mixer. Fold in the shredded chicken and 1 cup of the cheese blend until evenly combined.
- Fill the bread bowl. Spoon the buffalo chicken mixture into the hollowed bread bowl, packing it gently but not too tightly. Fill to about ½ inch below the rim to prevent overflow during baking. Mound the filling slightly in the center.
- Add the cheese topping. Sprinkle the remaining ½ cup of cheese blend over the top of the filling, covering the entire surface.
- Arrange on the baking sheet. Place the filled bread bowl on the baking sheet alongside the buttered bread cubes. Make sure the bread cubes are spread in a single layer with space between them for even toasting.
- Bake until golden and bubbling. Place in the oven and bake for 25-30 minutes. Check the bread cubes at 15 minutes—they may be done before the dip. Remove them when golden brown and crispy, and continue baking the bread bowl until the dip is bubbling and the cheese is melted with golden spots. The crust of the bread bowl should be deeply golden and crispy.
- Rest, garnish, and serve. Let the bread bowl rest for 5 minutes after removing from the oven. Sprinkle fresh parsley over the top. Place the bread bowl on a large serving platter and surround it with the toasted bread cubes. Have backup dippers ready—once the bread is gone, guests will still want more dip!
Pro Tips
- Choose a loaf with a sturdy, thick crust—sourdough and Italian rounds work best. Avoid soft sandwich bread rounds.
- If the bread bowl starts browning too much before the dip is heated through, tent loosely with aluminum foil.
- The bread bowl itself is edible! Encourage guests to tear off pieces once the cubes run out.
- Always have backup dippers ready—tortilla chips, celery, carrots. The bread bowl contents go FAST.
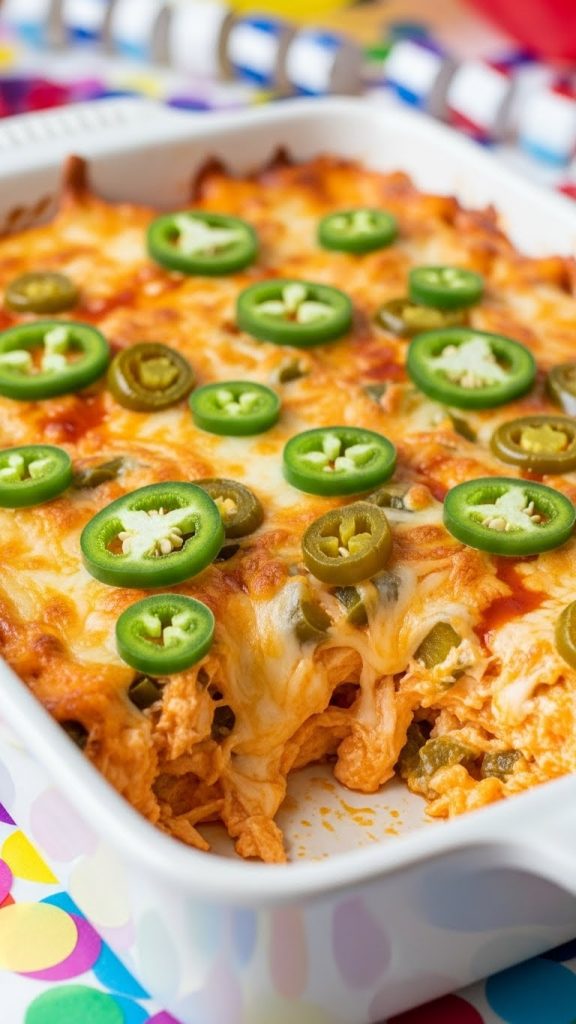
6. Jalapeño Popper Buffalo Chicken Dip
Two iconic appetizers collide in this mashup that brings the best elements of jalapeño poppers into your buffalo dip. You get the creamy, spicy base of buffalo chicken combined with the pickled jalapeño kick and pepper jack cheese that makes poppers so irresistible. The panko topping adds a satisfying crunch that sets this version apart.
Prep Time: 15 minutes | Cook Time: 30 minutes | Serves: 12-14
Ingredients
- 2 cups shredded chicken
- 8 oz cream cheese, softened
- ⅓ cup buffalo hot sauce
- ½ cup sour cream
- ½ cup pickled jalapeño slices (from a jar), roughly chopped
- 2 tablespoons jalapeño brine (from the jar)
- 1½ cups shredded pepper jack cheese, divided
- 4 strips bacon, cooked crispy and crumbled
- ½ cup panko breadcrumbs
- 2 tablespoons melted butter
- Fresh cilantro for garnish (optional)
Step-by-Step Instructions
- Preheat the oven. Set your oven to 375°F (190°C). Lightly grease a 9-inch baking dish or 10-inch cast iron skillet with cooking spray.
- Prepare the jalapeños. Drain the pickled jalapeños, reserving 2 tablespoons of the brine. Place the jalapeño slices on a cutting board and roughly chop them into small pieces, about ¼-inch bits. You want them small enough to distribute evenly but large enough to provide pops of heat.
- Create the creamy base. In a large mixing bowl, combine the softened cream cheese, buffalo sauce, sour cream, and reserved jalapeño brine. Beat with a hand mixer on medium speed for 2-3 minutes until the mixture is completely smooth and creamy. The jalapeño brine adds extra tangy heat.
- Add the chicken, jalapeños, and cheese. Fold the shredded chicken, chopped jalapeños, 1 cup of the pepper jack cheese, and half the bacon crumbles into the cream cheese mixture. Stir until everything is evenly distributed throughout.
- Transfer to the baking dish. Spoon the mixture into your prepared baking dish. Use a spatula to spread it into an even layer, pressing gently to eliminate air pockets. Smooth the top surface.
- Add the pepper jack topping. Sprinkle the remaining ½ cup of pepper jack cheese evenly over the surface of the dip.
- Prepare the panko topping. In a small bowl, combine the panko breadcrumbs with the melted butter. Toss with a fork until the panko is evenly coated and slightly clumpy. This buttery panko will toast into a golden, crunchy layer.
- Add the panko layer. Scatter the buttered panko evenly over the cheese layer. Try to cover the entire surface for maximum crunch in every bite.
- Bake until golden and crispy. Place in the oven and bake for 25-30 minutes. The dip is ready when the edges are bubbling vigorously, the cheese underneath the panko is melted, and the panko topping is golden brown and crispy. If the panko isn’t browning but the dip is hot, switch to broil for 1-2 minutes (watch carefully!).
- Add final toppings and serve. Remove from the oven and immediately scatter the remaining bacon crumbles over the top. Garnish with fresh cilantro if desired. Let rest for 3-4 minutes, then serve with sturdy tortilla chips that can handle the chunky, loaded dip.
Pro Tips
- Pickled jalapeños provide tangy, less intense heat than fresh ones—perfect for crowds with varying spice tolerances.
- Don’t skip the jalapeño brine! It adds a vinegary punch that brightens the entire dish.
- The panko topping is what makes this version special—it adds texture contrast that’s missing from traditional dips.
- For extra heat, add 1 fresh jalapeño, seeded and minced, in addition to the pickled ones.

7. Buffalo Chicken Dip Cups (Individual Servings)
Sometimes you want portion control. Sometimes you want to avoid the awkward “double-dipping” situation. And sometimes you just want your appetizer to look restaurant-worthy. These individual wonton cup servings solve all three problems while delivering the same great flavor in a grab-and-go format.
Prep Time: 25 minutes | Cook Time: 20 minutes | Makes: 24 cups
Ingredients
- 24 wonton wrappers (from the refrigerated section)
- 2 cups finely shredded chicken
- 6 oz cream cheese, softened
- ¼ cup buffalo sauce
- ¼ cup ranch dressing
- ¾ cup finely shredded cheddar cheese, divided
- Cooking spray
- 2 green onions, thinly sliced
- ¼ cup blue cheese crumbles
Step-by-Step Instructions
- Preheat the oven. Set your oven to 350°F (175°C). Position a rack in the center of the oven.
- Prepare the mini muffin tin. Generously spray a 24-cup mini muffin tin with cooking spray, making sure to coat the bottom and sides of each cup thoroughly. The wonton wrappers will stick if the tin isn’t well-greased.
- Form the wonton cups. Working with one wrapper at a time, gently press a wonton wrapper into each muffin cup. The wrapper should line the bottom and come up the sides, with the corners sticking up above the rim like a flower. Press the bottom flat to create a stable base for the filling. Repeat with all 24 wrappers.
- Pre-bake the wonton cups. Place the muffin tin in the oven and bake the empty wonton cups for 5-7 minutes until they’re lightly golden and starting to crisp. They should be firm enough to hold their shape but not fully browned—they’ll bake more with the filling. Remove from oven and set aside.
- Prepare the filling while cups bake. In a medium mixing bowl, combine the softened cream cheese, buffalo sauce, and ranch dressing. Beat with a hand mixer or whisk until completely smooth, about 2 minutes. The mixture should be creamy and pourable.
- Add chicken and cheese to filling. Fold the finely shredded chicken and ½ cup of the cheddar cheese into the cream cheese mixture. Stir until evenly combined. The filling should be thick but scoopable.
- Fill each wonton cup. Using a small spoon or cookie scoop, place about 1 heaping tablespoon of filling into each pre-baked wonton cup. Don’t overfill—leave a little room at the top for the cheese topping. The filling should come up to about ⅔ of the cup height.
- Top with remaining cheddar. Sprinkle the remaining ¼ cup of cheddar cheese evenly over all the filled cups, placing a small pinch on top of each one.
- Bake until filling is hot and cheese is melted. Return the muffin tin to the oven and bake for 10-12 minutes. The filling should be heated through and the cheese on top should be melted and slightly golden. The wonton wrapper edges should be golden brown and crispy.
- Cool slightly before removing. Let the cups cool in the tin for 2-3 minutes. This allows them to firm up slightly and makes removal easier. Use a small offset spatula or butter knife to gently lift each cup from the tin.
- Garnish and serve. Arrange the cups on a serving platter. Top each with a small pinch of sliced green onions and a few blue cheese crumbles. Serve immediately while warm and crispy.
Pro Tips
- Shred your chicken FINELY for this recipe—large chunks won’t fit properly in the small cups.
- Wonton cups can be pre-baked up to 2 days ahead and stored in an airtight container at room temperature.
- Make extra! These are addictive and guests will want seconds (and thirds).
- For crispy cups, don’t overfill—too much filling makes the wonton soggy on the bottom.
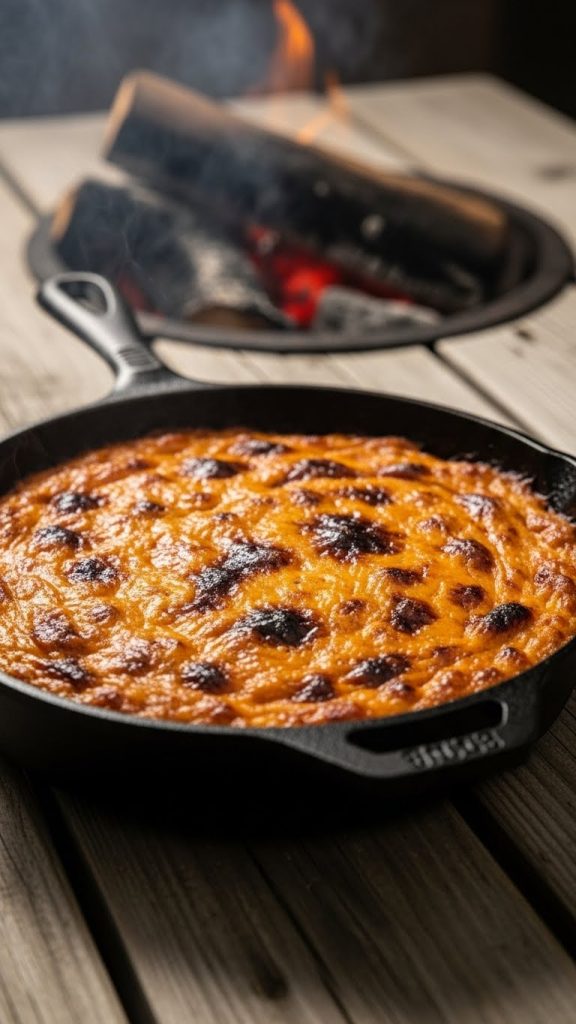
8. Smoked Buffalo Chicken Dip
For the grill masters and smoker enthusiasts out there, this recipe adds a whole new dimension to buffalo chicken dip. The smoking process infuses the dip with a subtle, woodsy flavor that elevates it from great to unforgettable. This is the version that gets people asking what your secret is.
Prep Time: 15 minutes | Cook Time: 45-60 minutes | Serves: 10-12
Ingredients
- 2 cups shredded chicken (smoked chicken is ideal if you have it)
- 8 oz cream cheese, softened
- ½ cup buffalo sauce
- ½ cup ranch dressing
- 1 cup shredded smoked gouda cheese
- ½ cup shredded sharp cheddar cheese
- ¼ teaspoon smoked paprika
- ¼ teaspoon garlic powder
- Wood chips (hickory or applewood recommended)
- Smoked salt for garnish (optional)
Step-by-Step Instructions
- Prepare your smoker. Preheat your smoker to 275°F (135°C). If using a gas or charcoal grill, set it up for indirect heat with the burners or coals on one side only. Add wood chips according to your smoker’s instructions—hickory provides a stronger smoke flavor, while applewood is milder and slightly sweet.
- Choose your cooking vessel. A cast iron skillet is ideal for smoking because it retains heat well and develops a nice crust on the edges of the dip. Alternatively, use a disposable aluminum pan if you don’t want to clean your skillet afterward. Avoid glass baking dishes as they can crack from temperature changes.
- Create the dip base. In a large mixing bowl, combine the softened cream cheese, buffalo sauce, ranch dressing, smoked paprika, and garlic powder. Beat with a hand mixer on medium speed for 2-3 minutes until completely smooth and all ingredients are fully incorporated.
- Add the chicken and smoked gouda. Fold the shredded chicken and smoked gouda cheese into the cream cheese mixture. Stir until evenly distributed. The smoked gouda will add an extra layer of smokiness even before the dip hits the smoker.
- Transfer to cooking vessel. Spoon the mixture into your cast iron skillet or aluminum pan. Spread into an even layer, pressing gently. Smooth the top surface.
- Add the cheddar topping. Sprinkle the shredded cheddar cheese evenly over the top of the dip, covering the entire surface from edge to edge.
- Place in the smoker. Set the skillet or pan on the smoker grate, positioning it away from direct heat if using a grill. Close the lid to trap the smoke inside. Make sure your smoker is producing thin, blue smoke—thick white smoke can make the dip taste bitter.
- Smoke until bubbling and infused. Smoke the dip for 45-60 minutes, maintaining a temperature around 275°F. The dip is ready when it’s bubbling around the edges, the cheese on top is melted and slightly golden, and it has taken on a light tan/golden color from the smoke. Check at 30 minutes to monitor progress.
- Rest before serving. Carefully remove the hot skillet from the smoker using heat-resistant gloves. Let the dip rest for 5-7 minutes—it will be extremely hot. If desired, sprinkle a pinch of smoked salt over the top for extra depth. Serve with sturdy tortilla chips or crusty bread.
Pro Tips
- Don’t over-smoke—45-60 minutes is the sweet spot. You want the smoke to complement the buffalo flavor, not overwhelm it.
- Smoked gouda doubles down on the smoky flavor without requiring extra smoking time.
- No smoker? Add ½ teaspoon liquid smoke to the mixture and bake in a regular oven at 350°F for 25 minutes.
- If you have leftover smoked chicken from another cook, use it here for double the smoke flavor.
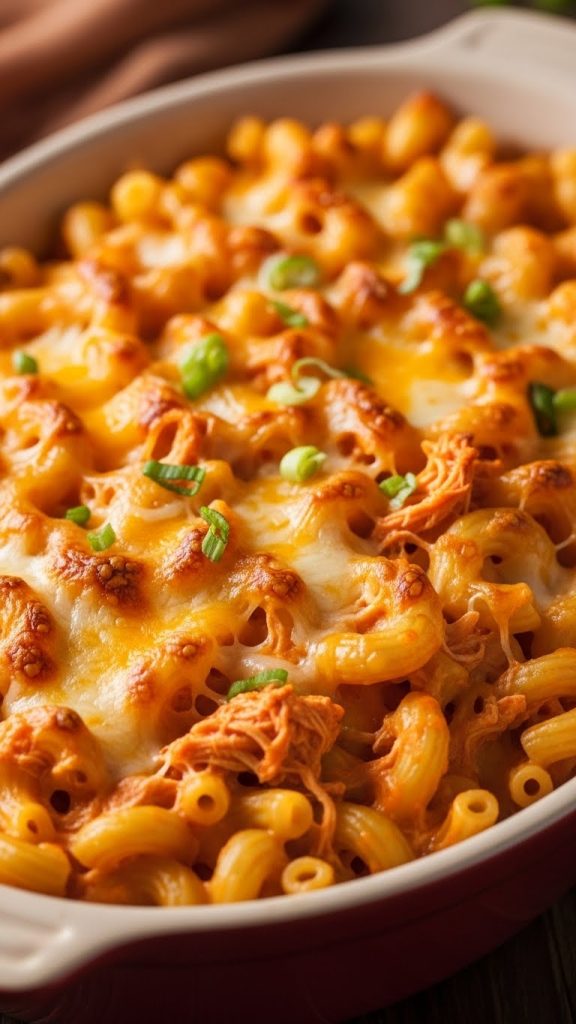
9. Buffalo Chicken Dip Mac & Cheese
This is what happens when you stop thinking of buffalo chicken dip as just an appetizer. By adding pasta, you transform it into a hearty dish that can serve as the main event for casual game day gatherings. It’s comfort food squared—creamy, cheesy, spicy, and completely addictive. Serve it as a main dish or a substantial side.
Prep Time: 20 minutes | Cook Time: 35 minutes | Serves: 8-10 as main, 12-14 as side
Ingredients
- 1 lb elbow macaroni or cavatappi pasta
- 2 cups shredded chicken
- 8 oz cream cheese, cut into 1-inch cubes
- ½ cup buffalo sauce
- ½ cup whole milk
- 2 cups shredded sharp cheddar cheese, divided
- ¼ cup ranch dressing
- ½ cup panko breadcrumbs
- 2 tablespoons melted butter
- ¼ cup crumbled blue cheese
- 2 green onions, sliced
- Extra buffalo sauce for drizzling
Step-by-Step Instructions
- Preheat oven and boil water. Set your oven to 375°F (190°C). Bring a large pot of salted water to a rolling boil. Use about 1 tablespoon of salt per gallon of water.
- Cook the pasta until just al dente. Add the pasta to the boiling water and cook according to package directions, but remove it 1-2 minutes BEFORE the recommended time. The pasta should be slightly firm in the center—it will continue cooking in the oven. Drain the pasta and return it to the pot. Do not rinse.
- Add cream cheese to hot pasta. Immediately add the cubed cream cheese to the hot drained pasta. The residual heat will start melting the cream cheese. Stir constantly for 1-2 minutes, using the heat from the pasta to melt the cream cheese into a creamy coating.
- Add buffalo sauce, milk, and ranch. Pour in the buffalo sauce, milk, and ranch dressing. Stir well to combine. The mixture should become saucy and coat the pasta evenly.
- Melt in the cheddar cheese. Add 1½ cups of the shredded cheddar cheese to the pot. Stir continuously over low heat for 2-3 minutes until the cheese is completely melted and the sauce is smooth and creamy. Remove from heat.
- Fold in the shredded chicken. Add the shredded chicken to the pot and stir until it’s evenly distributed throughout the pasta. Every bite should have chicken in it.
- Transfer to a baking dish. Pour the buffalo chicken mac and cheese into a 9×13-inch baking dish. Spread it into an even layer.
- Add remaining cheddar topping. Sprinkle the remaining ½ cup of cheddar cheese evenly over the top of the mac and cheese.
- Prepare and add panko topping. In a small bowl, mix the panko breadcrumbs with the melted butter until evenly coated. Scatter the buttered panko over the cheese layer, covering as much surface area as possible.
- Bake until golden and bubbling. Place in the oven and bake for 20-25 minutes until the sauce is bubbling around the edges and the panko topping is golden brown and crispy.
- Add final garnishes and serve. Remove from oven and let rest for 5 minutes. Scatter the blue cheese crumbles and green onions over the top. Drizzle with extra buffalo sauce if desired. Serve hot as a main dish or hearty side.
Pro Tips
- Undercook your pasta—it continues cooking in the oven and overcooked noodles become mushy.
- Cavatappi (corkscrew pasta) is ideal because the spirals catch and hold the creamy buffalo sauce.
- This dish reheats well—add a splash of milk when reheating to restore creaminess.
- Serve with extra buffalo sauce on the side for those who want more heat.
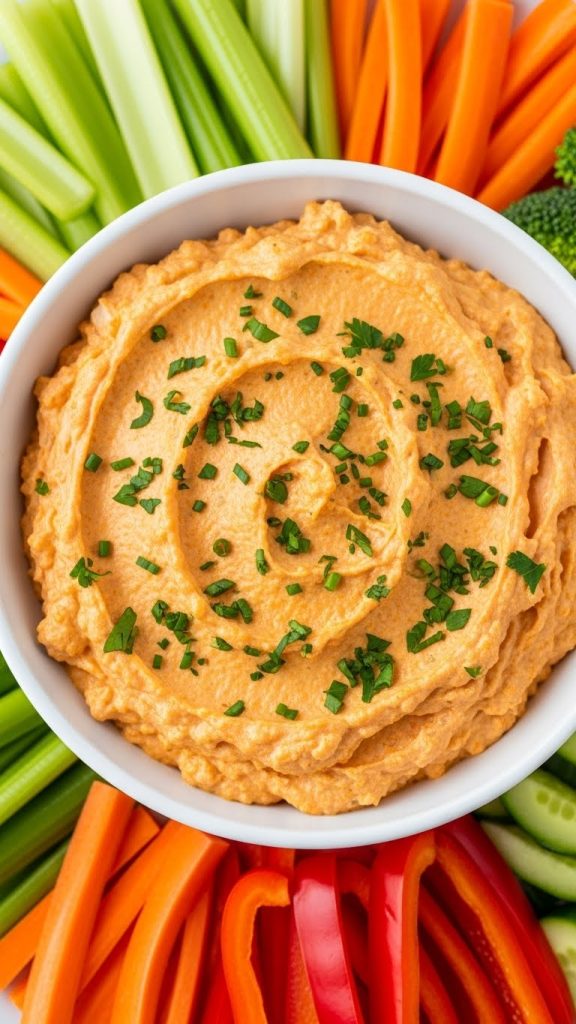
10. Vegan Buffalo Cauliflower Dip
Great hosts make sure everyone at the party can enjoy the food, and this plant-based version ensures your vegan and dairy-free guests aren’t stuck eating celery while everyone else demolishes the dip. Roasted cauliflower provides the hearty base, while cashew cream delivers the richness without any dairy. Even non-vegans will be impressed.
Prep Time: 20 minutes + 2 hours soaking | Cook Time: 50 minutes | Serves: 10-12
Ingredients
For the Roasted Cauliflower:
- 1 medium head cauliflower, cut into small florets (about 5-6 cups)
- ⅓ cup buffalo hot sauce (check label for vegan—Frank’s RedHot is vegan)
- 2 tablespoons olive oil
- ½ teaspoon garlic powder
- ¼ teaspoon salt
For the Cashew Cream:
- 1 cup raw cashews, soaked in hot water for 2 hours
- ½ cup unsweetened non-dairy milk (oat or almond works well)
- 2 tablespoons nutritional yeast
- 1 tablespoon fresh lemon juice
- ½ teaspoon garlic powder
- ½ teaspoon onion powder
- ¼ teaspoon salt
For Assembly:
- Additional ¼ cup buffalo sauce for the dip
- ¼ cup vegan shredded cheese (optional)
- 2 tablespoons fresh chives, chopped
- Tortilla chips, celery, and carrot sticks for serving
Step-by-Step Instructions
- Soak the cashews (do this first!). Place the raw cashews in a bowl and cover with very hot (nearly boiling) water. Let soak for at least 2 hours at room temperature. Alternatively, soak in room temperature water overnight (8-12 hours). The cashews should be soft enough to blend into a completely smooth cream. Drain before using.
- Preheat the oven for roasting. Set your oven to 425°F (220°C). Line a large rimmed baking sheet with parchment paper for easy cleanup and to prevent sticking.
- Prepare the cauliflower florets. Cut the cauliflower into small, bite-sized florets—about 1 to 1.5 inches each. Smaller pieces roast more evenly and become tender faster. Remove any large stems.
- Toss cauliflower with buffalo sauce and oil. In a large bowl, combine the cauliflower florets with the olive oil, ⅓ cup buffalo sauce (reserve the additional ¼ cup for later), garlic powder, and salt. Toss until every floret is evenly coated with the spicy orange mixture.
- Spread on the baking sheet. Arrange the coated cauliflower in a single layer on your prepared baking sheet. Don’t overcrowd—the florets need space between them to roast rather than steam. Use two baking sheets if necessary.
- Roast until charred and tender. Place in the oven and roast for 25-30 minutes, flipping the florets halfway through. The cauliflower is done when the edges are deeply charred and caramelized, and the florets are fork-tender. These charred bits add flavor depth that mimics the savory quality of chicken.
- Make the cashew cream while cauliflower roasts. Drain the soaked cashews and add them to a high-speed blender along with the non-dairy milk, nutritional yeast, lemon juice, garlic powder, onion powder, and salt. Blend on high for 2-3 minutes until completely smooth with no grit. Scrape down the sides as needed. The cream should be thick but pourable.
- Roughly chop the roasted cauliflower. Once the cauliflower is roasted, let it cool for 5 minutes. Transfer to a cutting board and roughly chop into smaller pieces—you want a mix of textures, some chunky and some finer.
- Reduce oven temperature. Lower the oven temperature to 375°F (190°C).
- Combine the dip ingredients. In a large bowl, combine the chopped roasted cauliflower, cashew cream, and the remaining ¼ cup of buffalo sauce. Stir until everything is evenly mixed and the cauliflower is coated in the creamy sauce.
- Transfer to a baking dish. Spoon the mixture into an 8-inch or 9-inch baking dish. Spread into an even layer. If using vegan shredded cheese, sprinkle it evenly over the top.
- Bake until bubbling. Place in the oven and bake for 15-20 minutes until the dip is heated through and bubbling around the edges. If using vegan cheese, it should be melted.
- Garnish and serve. Remove from the oven and let rest for 5 minutes. Scatter fresh chives over the top. Serve warm with tortilla chips, celery sticks, and carrot sticks. Label clearly as vegan so your plant-based guests know it’s safe for them!
Pro Tips
- Soak cashews long enough! At least 2 hours in hot water or overnight in cold. Under-soaked cashews make gritty cream.
- If your blender isn’t high-powered, strain the cashew cream through a fine mesh sieve for silky smoothness.
- Don’t skip the charring on the cauliflower—those caramelized edges add the umami depth that makes this satisfying.
- Check your buffalo sauce label! Most (including Frank’s RedHot) are vegan, but some contain butter.
Final Tips for Buffalo Chicken Dip Success
No matter which recipe you choose, keep these universal tips in mind to ensure dip perfection every time:
Soften your cream cheese properly. Leave it on the counter for at least 30-45 minutes before mixing. Microwaving works in a pinch (15-second intervals), but room temperature cream cheese incorporates more smoothly. Cold cream cheese creates lumps that even aggressive stirring can’t fully eliminate.
Shred your own chicken when possible. Pre-shredded rotisserie chicken works in a pinch, but freshly shredded has better texture and absorbs the sauce more effectively. For the best results, poach chicken breasts in seasoned broth, then shred while still warm.
Keep it warm throughout the party. Buffalo chicken dip is best served hot—the cheese gets stringy and the texture thickens as it cools. Use a slow cooker on “warm” setting, a fondue pot, or a warming tray to maintain temperature. Stir occasionally to prevent a skin from forming.
Prep ahead strategically. Most of these dips can be assembled (but not baked) up to 24 hours in advance. Cover tightly with plastic wrap and refrigerate. Add 5-10 minutes to the baking time if going straight from the refrigerator to the oven, and make sure the center is heated through before serving.
Variety is your friend. Offer multiple dippers: tortilla chips (sturdy restaurant-style work best), celery sticks, carrot sticks, bell pepper strips, pita chips, crackers, and sliced baguette all work beautifully. Having options accommodates different dietary needs and preferences.
Taste as you go. Hot sauce heat levels vary by brand, and personal preferences differ widely. Taste your dip before baking and adjust the buffalo sauce up or down. It’s easier to add heat than to take it away, so start conservatively if you’re unsure.
Now you have ten recipes in your arsenal, ranging from the classic crowd-pleaser to creative variations that will surprise and delight your guests. Pick one for your next Super Bowl party—or be ambitious and set up a buffalo chicken dip bar with two or three options. Your guests will talk about it long after the final whistle blows.
Game on.