
A new year means a fresh start, new resolutions, and plenty of opportunities to gather around the table with the people who matter most. Whether you’re hosting a casual New Year’s Day brunch, feeding hungry guests after a late night of celebration, or simply looking for satisfying weeknight dinners to kick off January, ground beef is your budget-friendly, versatile secret weapon.
Ground beef is the unsung hero of home cooking. It’s affordable, available everywhere, cooks quickly, and adapts to virtually any cuisine or flavor profile. From elegant stuffed peppers that impress dinner guests to a steaming pot of chili that feeds a crowd, ground beef delivers comfort and satisfaction without requiring hours of preparation or expensive ingredients.
These ten recipes range from quick weeknight solutions to showstopping centerpieces worthy of your New Year’s celebration. Each one includes detailed ingredients, step-by-step instructions, and expert tips to ensure your success. Some are perfect for meal prepping as you head into a busy January, while others are designed to impress guests and make your holiday table memorable.
Let’s ring in the new year with delicious, hearty meals that bring everyone together. Here are ten ground beef recipes that will make January feel a little warmer and a lot more delicious.

1. Classic Homemade Meatballs in Marinara
There’s something deeply satisfying about a plate of tender, juicy meatballs swimming in rich marinara sauce. This recipe produces meatballs that are pillowy soft on the inside with just enough structure to hold together beautifully. Serve them over spaghetti for a classic presentation, pile them into crusty rolls for meatball subs, or set them out as appetizers for your New Year’s gathering. They’re crowd-pleasers in every format.
Prep Time: 20 minutes | Cook Time: 35 minutes | Serves: 6-8
Ingredients
For the Meatballs:
- 1½ pounds ground beef (80/20 blend)
- ½ pound ground pork
- ¾ cup Italian breadcrumbs
- ½ cup whole milk
- 2 large eggs, beaten
- ½ cup freshly grated Parmesan cheese
- 4 cloves garlic, minced
- ¼ cup fresh parsley, finely chopped
- 1 teaspoon salt
- ½ teaspoon black pepper
- ½ teaspoon dried oregano
For the Marinara:
- 2 cans (28 oz each) San Marzano crushed tomatoes
- 4 cloves garlic, minced
- 1 medium onion, finely diced
- 3 tablespoons olive oil
- 1 teaspoon dried basil
- 1 teaspoon sugar
- Salt and pepper to taste
- Fresh basil for garnish
Step-by-Step Instructions
- Make the panade. In a small bowl, combine the breadcrumbs and milk. Let this mixture sit for 5-10 minutes until the breadcrumbs have absorbed all the milk and become a paste. This panade is the secret to incredibly tender meatballs—it adds moisture that stays trapped inside during cooking.
- Combine the meatball ingredients. In a large bowl, add the ground beef, ground pork, soaked breadcrumb mixture, beaten eggs, Parmesan, garlic, parsley, salt, pepper, and oregano. Using your hands, gently mix everything together until just combined. Don’t overmix or the meatballs will become tough and dense.
- Form the meatballs. Using wet hands to prevent sticking, roll the mixture into balls about 1½ inches in diameter—roughly the size of a golf ball. You should get 24-30 meatballs. Place them on a baking sheet as you work. Try to make them uniform in size so they cook evenly.
- Brown the meatballs. Heat 2 tablespoons of olive oil in a large, deep skillet or Dutch oven over medium-high heat. Working in batches to avoid crowding, brown the meatballs on all sides, about 2-3 minutes per batch. They don’t need to cook through—just develop a golden-brown crust. Transfer browned meatballs to a plate.
- Start the marinara. In the same pan, reduce heat to medium and add 3 tablespoons of olive oil. Add the diced onion and cook until softened and translucent, about 5 minutes. Add the minced garlic and cook for another minute until fragrant. Don’t let the garlic brown or it will become bitter.
- Build the sauce. Pour in the crushed tomatoes, scraping up any browned bits from the bottom of the pan. Add the dried basil, sugar, salt, and pepper. Stir well to combine. The sugar balances the acidity of the tomatoes—it won’t make the sauce sweet.
- Simmer the meatballs in sauce. Gently nestle the browned meatballs into the sauce. Reduce heat to low, cover, and simmer for 20-25 minutes, turning the meatballs once halfway through. The meatballs will finish cooking in the sauce and absorb all those delicious flavors.
- Serve and garnish. Taste the sauce and adjust seasoning if needed. Serve the meatballs and sauce over cooked spaghetti, in hoagie rolls, or as appetizers with toothpicks. Garnish with fresh basil and extra Parmesan cheese.
Pro Tips
- The pork adds moisture and richness—don’t substitute all beef or the meatballs will be drier.
- San Marzano tomatoes are worth seeking out—they’re sweeter and less acidic than regular canned tomatoes.
- Make meatballs ahead and freeze them raw on a baking sheet, then transfer to freezer bags for up to 3 months.
- For even more tender meatballs, bake them at 400°F for 15 minutes instead of pan-frying before adding to sauce.

2. Hearty Beef and Black Bean Chili
Nothing warms up a cold January day quite like a steaming bowl of homemade chili. This recipe balances heat, sweetness, and depth of flavor with layers of spices that meld together during a long simmer. It’s perfect for feeding a crowd on New Year’s Day, makes excellent leftovers that taste even better the next day, and freezes beautifully for busy weeknights ahead.
Prep Time: 15 minutes | Cook Time: 1 hour 30 minutes | Serves: 8-10
Ingredients
- 2 pounds ground beef (80/20 blend)
- 2 cans (15 oz each) black beans, drained and rinsed
- 1 can (28 oz) diced tomatoes with juices
- 1 can (15 oz) tomato sauce
- 2 cups beef broth
- 1 large onion, diced
- 1 green bell pepper, diced
- 1 red bell pepper, diced
- 4 cloves garlic, minced
- 2 jalapeños, seeded and minced (optional)
- 3 tablespoons chili powder
- 2 teaspoons ground cumin
- 1 teaspoon smoked paprika
- 1 teaspoon dried oregano
- ½ teaspoon cayenne pepper (adjust to taste)
- 1 tablespoon brown sugar
- 2 tablespoons tomato paste
- Salt and black pepper to taste
- Toppings: sour cream, shredded cheese, green onions, cilantro
Step-by-Step Instructions
- Brown the beef. In a large Dutch oven or heavy-bottomed pot, cook the ground beef over medium-high heat, breaking it into crumbles with a wooden spoon. Cook until browned and no pink remains, about 8-10 minutes. Don’t drain the fat—it adds flavor. Transfer the beef to a plate and set aside.
- Sauté the aromatics. In the same pot with the beef drippings, add the onion, bell peppers, and jalapeños (if using). Cook over medium heat until softened, about 6-7 minutes. Add the garlic and cook for another minute until fragrant.
- Toast the spices. Add the chili powder, cumin, smoked paprika, oregano, and cayenne to the vegetables. Stir constantly for 1-2 minutes to toast the spices and bloom their flavors. This step is crucial—it transforms raw-tasting spices into deep, complex flavor.
- Add tomato paste. Push the vegetables to the side and add the tomato paste to a clear spot in the pot. Let it cook for 1-2 minutes, stirring, until it darkens slightly. This caramelizes the tomato paste and adds another layer of depth.
- Build the chili. Return the browned beef to the pot. Add the diced tomatoes, tomato sauce, beef broth, black beans, and brown sugar. Stir everything together until well combined. The brown sugar balances the acidity of the tomatoes and adds subtle sweetness.
- Simmer low and slow. Bring the chili to a boil, then reduce heat to low. Cover and simmer for at least 1 hour, stirring occasionally. The longer it simmers, the better the flavors meld. For best results, simmer for 1½ to 2 hours if time allows.
- Adjust seasoning. Taste and adjust salt, pepper, and heat level as needed. If the chili is too thick, add more broth. If too thin, simmer uncovered for the last 15-20 minutes to reduce.
- Serve with toppings. Ladle the chili into bowls and set out toppings for guests to customize: sour cream, shredded cheddar or Mexican blend cheese, sliced green onions, fresh cilantro, and hot sauce for those who want extra heat.
Pro Tips
- Make this a day ahead—chili always tastes better the next day as flavors continue to develop.
- For a thicker chili, mash half a can of beans before adding them to the pot.
- Add 1 oz of dark chocolate or 2 tablespoons of cocoa powder for secret depth and richness.
- Freeze in individual portions for easy weeknight dinners throughout January.

3. Stuffed Bell Peppers with Rice and Cheese
Colorful, elegant, and individually portioned, stuffed peppers make a beautiful presentation for a New Year’s dinner. Each pepper is a complete meal in itself—protein, vegetables, grains, and cheese all in one tidy, edible package. They’re impressive enough for guests but easy enough for a weeknight dinner, and they reheat beautifully for lunches throughout the week.
Prep Time: 25 minutes | Cook Time: 45 minutes | Serves: 6
Ingredients
- 6 large bell peppers (any color)
- 1½ pounds ground beef
- 1 cup cooked rice (white or brown)
- 1 can (14.5 oz) diced tomatoes, drained (reserve liquid)
- 1 can (8 oz) tomato sauce
- 1 medium onion, finely diced
- 3 cloves garlic, minced
- 1½ cups shredded cheddar cheese, divided
- 2 teaspoons Worcestershire sauce
- 1 teaspoon Italian seasoning
- 1 teaspoon salt
- ½ teaspoon black pepper
- 2 tablespoons olive oil
- Fresh parsley for garnish
Step-by-Step Instructions
- Preheat oven and prep peppers. Preheat your oven to 375°F. Cut the tops off each bell pepper and remove the seeds and membranes from inside. If the peppers won’t stand upright, trim a tiny bit off the bottom to create a flat base—be careful not to cut through to the inside.
- Blanch the peppers. Bring a large pot of salted water to a boil. Add the prepared peppers and cook for 3-4 minutes until slightly softened but still holding their shape. Remove with tongs and place upside down on paper towels to drain. This step ensures the peppers cook evenly and become tender.
- Cook the beef and aromatics. Heat olive oil in a large skillet over medium-high heat. Add the diced onion and cook until softened, about 4 minutes. Add the ground beef and cook, breaking it into crumbles, until browned and cooked through. Add the garlic and cook for 1 minute more.
- Build the filling. Remove the skillet from heat. Add the cooked rice, drained diced tomatoes, half of the tomato sauce, Worcestershire sauce, Italian seasoning, salt, pepper, and 1 cup of the shredded cheese. Stir until everything is well combined.
- Prepare the baking dish. Spread the remaining tomato sauce mixed with the reserved tomato juice on the bottom of a 9×13-inch baking dish. This creates a flavorful base that keeps the peppers moist and adds extra sauce for serving.
- Stuff the peppers. Stand the blanched peppers upright in the prepared baking dish. Divide the filling evenly among the peppers, packing it in gently and mounding it slightly on top. The peppers should be generously filled.
- Bake covered. Cover the baking dish tightly with aluminum foil. Bake for 30 minutes. The covered baking steams the peppers and ensures the filling heats through completely.
- Add cheese and finish baking. Remove the foil and top each pepper with the remaining ½ cup of shredded cheese. Return to the oven uncovered and bake for another 10-15 minutes until the cheese is melted and bubbly and the peppers are tender when pierced with a fork.
- Rest and serve. Let the peppers rest for 5 minutes before serving—they’ll be extremely hot inside. Serve each pepper with a spoonful of the sauce from the bottom of the dish. Garnish with fresh parsley.
Pro Tips
- Use a mix of colored peppers for a stunning presentation—red, yellow, and orange are sweeter than green.
- Substitute cauliflower rice for regular rice to make this lower in carbs.
- Make the filling a day ahead and store in the refrigerator—it makes assembly much faster.
- Leftover filling makes an excellent taco or burrito filling.

4. Korean Beef Bulgogi Bowls
Bring the flavors of Korea to your New Year’s table with these addictively delicious beef bowls. Sweet, savory, and slightly caramelized ground beef sits atop fluffy rice with fresh vegetables and a runny fried egg. It’s a balanced, flavorful meal that comes together in under 30 minutes—perfect for when you want something special without spending hours in the kitchen.
Prep Time: 15 minutes | Cook Time: 15 minutes | Serves: 4
Ingredients
For the Beef:
- 1½ pounds ground beef
- 5 cloves garlic, minced
- 1 tablespoon fresh ginger, minced
- ⅓ cup soy sauce
- 2 tablespoons brown sugar
- 1 tablespoon sesame oil
- 1 tablespoon rice vinegar
- 1 tablespoon gochujang (Korean chili paste)
- ½ teaspoon black pepper
For the Bowls:
- 4 cups cooked white or brown rice
- 4 fried eggs
- 2 cups shredded cabbage or coleslaw mix
- 1 large carrot, julienned or shredded
- 4 green onions, sliced
- 1 cucumber, sliced
- Sesame seeds for garnish
- Kimchi for serving (optional)
- Sriracha or gochujang for extra heat
Step-by-Step Instructions
- Make the sauce. In a small bowl, whisk together the soy sauce, brown sugar, sesame oil, rice vinegar, gochujang, and black pepper until the sugar dissolves. Set aside. This is the magic sauce that gives the beef its signature Korean flavor.
- Cook the beef. Heat a large skillet or wok over medium-high heat. Add the ground beef and cook, breaking it into small crumbles, until browned and cooked through, about 6-8 minutes. Drain excess fat if there’s more than a tablespoon or two.
- Add aromatics. Add the minced garlic and ginger to the beef. Cook for 1-2 minutes, stirring constantly, until very fragrant. The garlic and ginger should sizzle but not burn.
- Add the sauce. Pour the sauce over the beef and stir to coat evenly. Continue cooking for 2-3 minutes until the sauce thickens slightly and coats the meat. The beef should be glossy and caramelized. Remove from heat.
- Fry the eggs. In a separate non-stick pan, fry 4 eggs to your preference—sunny side up with runny yolks is traditional and creates a rich sauce when broken over the bowl. Season lightly with salt.
- Assemble the bowls. Divide the cooked rice among 4 bowls. Top each with a generous portion of the Korean beef, arranged on one side. Add sections of shredded cabbage, julienned carrots, sliced cucumber, and green onions around the bowl.
- Add the finishing touches. Top each bowl with a fried egg. Sprinkle generously with sesame seeds and extra sliced green onions. Serve with kimchi on the side if desired, and offer sriracha or extra gochujang for those who like more heat.
Pro Tips
- Gochujang is available in most grocery stores in the international aisle—it’s essential for authentic flavor.
- Keep the beef crumbles small for the best texture and sauce distribution.
- Quick-pickled cucumbers (sliced cucumber in rice vinegar with a pinch of sugar) add great contrast.
- The beef mixture keeps for 4 days refrigerated and reheats perfectly for meal prep.

5. Ultimate Beef Tacos with Fresh Toppings
Taco night is always a celebration, and these perfectly seasoned beef tacos are the ultimate crowd-pleaser for New Year’s gatherings. The homemade seasoning blend beats any packet, and setting up a taco bar lets guests customize their own creations. It’s interactive, fun, and guaranteed to make everyone happy—from picky kids to adventurous adults.
Prep Time: 20 minutes | Cook Time: 15 minutes | Serves: 6-8
Ingredients
For the Taco Meat:
- 2 pounds ground beef
- 1 medium onion, finely diced
- 4 cloves garlic, minced
- 2 tablespoons chili powder
- 1 tablespoon ground cumin
- 1 teaspoon smoked paprika
- 1 teaspoon garlic powder
- ½ teaspoon onion powder
- ½ teaspoon dried oregano
- ¼ teaspoon cayenne pepper
- 1 teaspoon salt
- ½ teaspoon black pepper
- ¾ cup water or beef broth
- 1 tablespoon tomato paste
For Serving:
- 12-16 small flour or corn tortillas, warmed
- Shredded lettuce
- Diced tomatoes
- Shredded cheese (cheddar or Mexican blend)
- Sour cream
- Fresh cilantro
- Diced onion
- Lime wedges
- Salsa and hot sauce
- Pickled jalapeños
- Guacamole
Step-by-Step Instructions
- Mix the taco seasoning. In a small bowl, combine the chili powder, cumin, smoked paprika, garlic powder, onion powder, oregano, cayenne, salt, and black pepper. Stir well to combine. This homemade blend is fresher and more flavorful than any store-bought packet.
- Sauté the onion. Heat a large skillet over medium-high heat. Add 1 tablespoon of oil and the diced onion. Cook until softened and starting to brown, about 4-5 minutes.
- Brown the beef. Add the ground beef to the skillet with the onions. Cook, breaking it into small crumbles with a wooden spoon, until browned and cooked through, about 6-8 minutes. Add the minced garlic and cook for 1 minute more.
- Add the seasoning and tomato paste. Sprinkle the taco seasoning blend over the beef and stir to coat evenly. Add the tomato paste and stir to incorporate. Cook for 1-2 minutes to toast the spices.
- Add liquid and simmer. Pour in the water or beef broth. Stir well to combine everything. Reduce heat to medium-low and simmer for 5-7 minutes until the liquid reduces and the meat is saucy but not soupy. The mixture should coat the meat, not pool at the bottom.
- Warm the tortillas. While the meat simmers, warm your tortillas. For soft tortillas, wrap in damp paper towels and microwave for 30 seconds, or char briefly over a gas flame or in a dry skillet for more flavor and slight crispness.
- Set up the taco bar. Arrange all toppings in small bowls. Place the warm tortillas in a towel-lined basket to keep warm. Transfer the taco meat to a serving bowl. Let everyone build their own perfect tacos with their favorite toppings.
Pro Tips
- Make a double batch of the seasoning and store it in an airtight container for future taco nights.
- For crispy tacos, fry corn tortillas in oil until crisp, or use store-bought hard taco shells.
- The meat can be made ahead and reheated—add a splash of water when reheating to restore moisture.
- Leftover taco meat makes excellent nachos, quesadillas, or taco salads.

6. Shepherd’s Pie with Creamy Mashed Potatoes
This British-inspired comfort classic is the definition of cozy winter food. A rich, savory meat filling is topped with a cloud of creamy mashed potatoes and baked until golden and bubbling. Technically, shepherd’s pie uses lamb while cottage pie uses beef, but this version uses ground beef because it’s accessible, affordable, and utterly delicious. It’s the perfect centerpiece for a New Year’s Day gathering.
Prep Time: 30 minutes | Cook Time: 45 minutes | Serves: 8
Ingredients
For the Meat Filling:
- 2 pounds ground beef
- 1 large onion, diced
- 3 carrots, peeled and diced
- 2 celery stalks, diced
- 4 cloves garlic, minced
- 1 cup frozen peas
- 2 tablespoons tomato paste
- 2 tablespoons all-purpose flour
- 1½ cups beef broth
- 2 tablespoons Worcestershire sauce
- 1 teaspoon fresh thyme (or ½ teaspoon dried)
- 1 teaspoon fresh rosemary, minced (or ½ teaspoon dried)
- Salt and pepper to taste
For the Mashed Potatoes:
- 3 pounds Yukon Gold potatoes, peeled and cubed
- 6 tablespoons butter
- ¾ cup whole milk or heavy cream, warmed
- 1 teaspoon salt
- ½ teaspoon white pepper
- 1 egg yolk (optional, for extra richness and browning)
Step-by-Step Instructions
- Cook the potatoes. Place the cubed potatoes in a large pot and cover with cold, salted water. Bring to a boil, then reduce heat and simmer until fork-tender, about 15-20 minutes. Drain well and return to the warm pot to let excess moisture evaporate.
- Mash the potatoes. Add the butter to the warm potatoes and mash until mostly smooth. Add the warmed milk gradually, mashing and stirring until creamy and smooth. Season with salt and white pepper. If using, stir in the egg yolk for extra richness. Set aside.
- Brown the beef. In a large oven-safe skillet or Dutch oven, cook the ground beef over medium-high heat until browned, breaking it into crumbles. Transfer to a plate with a slotted spoon, leaving the drippings in the pan.
- Sauté the vegetables. Add the onion, carrots, and celery to the drippings. Cook over medium heat until softened, about 8 minutes. Add the garlic and cook for 1 minute more.
- Build the gravy base. Add the tomato paste and flour to the vegetables. Stir constantly for 1-2 minutes to cook the flour. Gradually pour in the beef broth, stirring to prevent lumps. Add the Worcestershire sauce, thyme, and rosemary.
- Combine and simmer. Return the browned beef to the pan. Stir in the frozen peas. Simmer for 10 minutes until the gravy thickens and coats the meat and vegetables. Season with salt and pepper to taste. The filling should be thick and saucy, not soupy.
- Top with mashed potatoes. Preheat your oven to 400°F. If you cooked the filling in an oven-safe pan, you can bake right in it. Otherwise, transfer the filling to a 9×13-inch baking dish. Spread the mashed potatoes evenly over the meat filling, starting at the edges to seal. Use a fork to create peaks that will crisp up beautifully.
- Bake until golden. Bake for 25-30 minutes until the potatoes are golden brown on top and the filling is bubbling around the edges. For extra browning, broil for 2-3 minutes at the end, watching carefully to prevent burning.
- Rest before serving. Let the shepherd’s pie rest for 10 minutes before serving. This allows the filling to set slightly, making it easier to serve neat portions. The pie will be extremely hot inside.
Pro Tips
- Yukon Gold potatoes make the creamiest mash—their buttery flavor is perfect for this dish.
- Add a cup of shredded sharp cheddar to the mashed potatoes for cheesy shepherd’s pie.
- Make the filling a day ahead and store it refrigerated—this actually improves the flavor.
- Individual ramekins make elegant single-serving presentations for dinner parties.

7. Asian Lettuce Wraps
Light, fresh, and bursting with flavor, these lettuce wraps are a sophisticated appetizer or a healthy dinner option. Savory seasoned beef is nestled in crisp butter lettuce cups, topped with crunchy water chestnuts and fresh herbs. They’re interactive and fun to eat, making them perfect for New Year’s gatherings when you want something impressive but not too heavy.
Prep Time: 15 minutes | Cook Time: 12 minutes | Serves: 4-6
Ingredients
- 1½ pounds ground beef
- 1 can (8 oz) water chestnuts, drained and diced
- 5 cloves garlic, minced
- 1 tablespoon fresh ginger, minced
- 4 green onions, sliced (white and green parts separated)
- ¼ cup soy sauce
- 2 tablespoons hoisin sauce
- 1 tablespoon rice vinegar
- 1 tablespoon sesame oil
- 1 teaspoon sriracha (or to taste)
- 2 tablespoons vegetable oil
- 2 heads butter lettuce, leaves separated and washed
- Fresh cilantro for garnish
- Shredded carrots for garnish
- Sesame seeds for garnish
Step-by-Step Instructions
- Make the sauce. In a small bowl, whisk together the soy sauce, hoisin sauce, rice vinegar, sesame oil, and sriracha. Set aside.
- Prepare the lettuce cups. Carefully separate the lettuce leaves, keeping them as whole as possible. Wash and pat dry thoroughly—wet lettuce makes soggy wraps. Arrange on a serving platter and refrigerate until ready to serve.
- Cook the beef. Heat vegetable oil in a large skillet or wok over high heat. Add the ground beef and cook, breaking into small crumbles, until browned and crispy in spots, about 6-8 minutes. Keep the crumbles small for easier wrapping.
- Add aromatics. Push the beef to the side of the pan. Add the garlic, ginger, and white parts of the green onions to the empty side. Cook for 30 seconds until fragrant, then stir everything together.
- Add water chestnuts and sauce. Add the diced water chestnuts and pour the sauce over everything. Stir well to coat. Cook for 2-3 minutes until the sauce reduces slightly and coats the meat. The mixture should be flavorful and just slightly saucy.
- Finish and serve. Transfer the beef mixture to a serving bowl. Garnish with the green parts of the scallions, fresh cilantro, shredded carrots, and sesame seeds. Serve alongside the chilled lettuce cups. Let guests spoon the filling into lettuce leaves and wrap.
Pro Tips
- Butter lettuce works best—its cup shape holds the filling perfectly without cracking.
- Water chestnuts add essential crunch—don’t skip them.
- Serve with extra hoisin sauce and sriracha on the side for customization.
- Make the filling ahead and reheat gently—it’s great for party prep.

8. Cheesy Beef Enchiladas
Smothered in red enchilada sauce and buried under melted cheese, these beef enchiladas are pure comfort food. Corn tortillas are stuffed with seasoned beef and cheese, rolled up, and baked until bubbly and irresistible. They’re perfect for feeding a crowd and always disappear faster than you expect. Make them for New Year’s Eve dinner or as hearty leftovers for January 1st.
Prep Time: 25 minutes | Cook Time: 25 minutes | Serves: 6-8
Ingredients
- 1½ pounds ground beef
- 1 medium onion, diced
- 3 cloves garlic, minced
- 1 can (4 oz) diced green chiles
- 2 cans (10 oz each) red enchilada sauce
- 3 cups shredded Mexican blend cheese, divided
- 1 cup sour cream
- 12 corn tortillas
- 1 teaspoon ground cumin
- 1 teaspoon chili powder
- Salt and pepper to taste
- Fresh cilantro and sliced green onions for garnish
- Vegetable oil for softening tortillas
Step-by-Step Instructions
- Preheat oven and prep pan. Preheat your oven to 375°F. Spread ½ cup of enchilada sauce on the bottom of a 9×13-inch baking dish to prevent sticking.
- Cook the beef filling. In a large skillet over medium-high heat, cook the ground beef and onion, breaking the meat into crumbles, until browned and the onion is softened. Add the garlic, cumin, and chili powder. Cook for 1 minute. Drain excess fat if needed.
- Add green chiles and sour cream. Stir in the diced green chiles and sour cream until well combined. Add 1 cup of shredded cheese and stir until melted and creamy. Season with salt and pepper to taste. Remove from heat.
- Soften the tortillas. In a small skillet, heat about ¼ inch of vegetable oil over medium heat. Quickly dip each tortilla in the hot oil for just 5-10 seconds per side until pliable but not crispy. Drain on paper towels. Alternatively, wrap tortillas in damp paper towels and microwave for 30 seconds.
- Assemble the enchiladas. Dip each softened tortilla in enchilada sauce to coat lightly. Place about ⅓ cup of the beef filling down the center of each tortilla. Roll up tightly and place seam-side down in the prepared baking dish. Repeat with remaining tortillas, arranging them snugly in the dish.
- Top and bake. Pour the remaining enchilada sauce evenly over the rolled enchiladas, making sure to cover the edges (this prevents them from drying out). Sprinkle the remaining 2 cups of cheese over the top.
- Bake until bubbly. Bake uncovered for 20-25 minutes until the cheese is melted and bubbly and the edges are lightly browned. The sauce should be bubbling around the edges of the dish.
- Garnish and serve. Let rest for 5 minutes before serving. Garnish with fresh cilantro and sliced green onions. Serve with additional sour cream, guacamole, and salsa on the side.
Pro Tips
- Softening tortillas in oil makes them pliable and prevents cracking during rolling.
- Make the filling a day ahead for faster assembly on party day.
- Cover edges of tortillas completely with sauce or they’ll become tough and chewy.
- Assemble up to 24 hours ahead, refrigerate, and bake when ready—add 10 minutes to baking time if cold.

9. Gourmet Smash Burgers
Forget everything you know about thick, puffed-up burgers. Smash burgers are thin, crispy-edged, and packed with more flavor per bite than any restaurant patty. The secret is pressing the beef onto a screaming hot surface to maximize the delicious browned crust. Stack two patties, add your favorite toppings, and you’ve got a burger that will make everyone forget about New Year’s resolutions—at least for one meal.
Prep Time: 10 minutes | Cook Time: 15 minutes | Serves: 4
Ingredients
- 1½ pounds ground beef (80/20 blend is essential)
- 8 slices American cheese
- 4 brioche or potato buns, toasted
- Kosher salt
- Black pepper
- Vegetable oil or butter for the griddle
For the Special Sauce:
- ½ cup mayonnaise
- 2 tablespoons ketchup
- 1 tablespoon yellow mustard
- 1 tablespoon dill pickle relish
- 1 teaspoon white vinegar
- ½ teaspoon garlic powder
- Pinch of paprika
Toppings:
- Shredded iceberg lettuce
- Sliced tomatoes
- Thinly sliced onion
- Dill pickle slices
Step-by-Step Instructions
- Make the special sauce. Whisk together the mayonnaise, ketchup, mustard, pickle relish, vinegar, garlic powder, and paprika in a small bowl. Refrigerate until ready to use. This is best made at least 30 minutes ahead so flavors can meld.
- Portion the beef. Divide the ground beef into 8 equal portions (about 3 ounces each). Loosely form each portion into a ball—don’t pack it tightly. The loose texture creates the best crust. Season the balls generously with salt and pepper on all sides.
- Heat your cooking surface. Heat a cast iron skillet, flat griddle, or plancha over high heat until it’s smoking hot—this takes at least 5 minutes. Add a thin layer of vegetable oil or butter. The surface must be extremely hot to achieve the proper crust.
- Smash the patties. Place 2-4 beef balls on the hot surface (don’t overcrowd). Immediately press each ball flat with a sturdy spatula or a burger press, using firm pressure. Press until the patty is about ¼-inch thick. Don’t move them once smashed.
- Cook the first side. Cook without moving for 2-3 minutes until the edges are deeply browned and crispy and a crust has formed on the bottom. You should see the edges starting to brown and get lacey.
- Flip and add cheese. Use a thin metal spatula to scrape under each patty (don’t leave any crust behind on the griddle—that’s flavor!). Flip the patties. Immediately place a slice of American cheese on each patty. Cook for 1 more minute.
- Toast the buns. While the patties finish cooking, toast the cut sides of the buns on the griddle or in a toaster until golden brown. Toasted buns add texture and prevent them from getting soggy.
- Assemble the burgers. Spread special sauce on both halves of each toasted bun. Stack two patties on the bottom bun. Add pickles, onion, lettuce, and tomato. Crown with the top bun. Serve immediately—smash burgers are best hot off the griddle.
Pro Tips
- 80/20 ground beef is non-negotiable—leaner beef won’t get crispy and will be dry.
- Don’t touch the patties once smashed—let the crust develop undisturbed.
- American cheese melts perfectly and adds creaminess that other cheeses can’t match.
- Open a window or turn on your vent—smash burgers create a lot of smoke (in a good way).
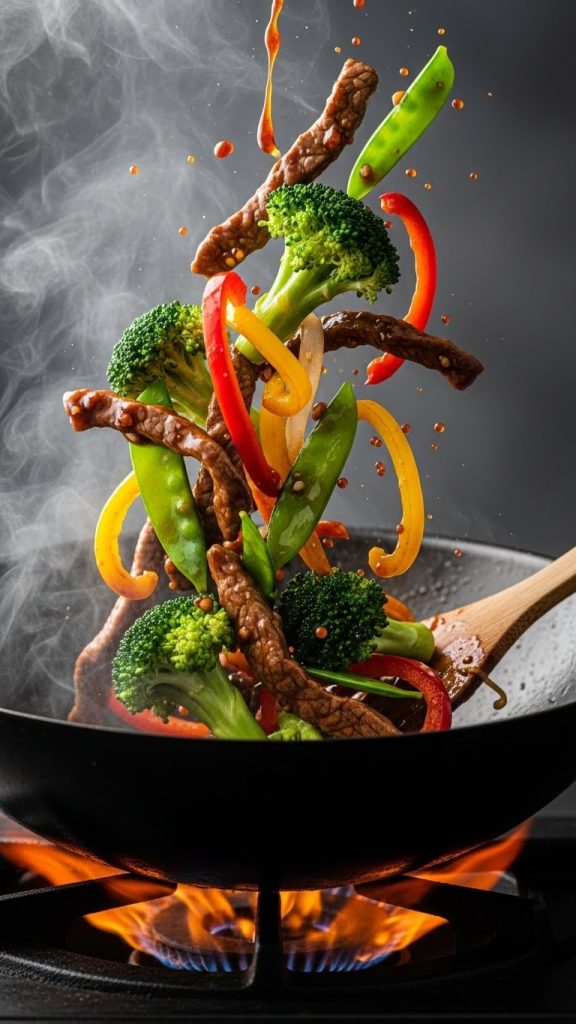
10. Beef and Vegetable Stir-Fry
When you want a nutritious, balanced meal on the table in under 30 minutes, this stir-fry delivers. Savory ground beef pairs with crisp-tender vegetables in a glossy, garlicky sauce that clings to every bite. It’s lighter than many comfort foods but still deeply satisfying—perfect for when you want to start the new year with healthier eating without sacrificing flavor.
Prep Time: 15 minutes | Cook Time: 12 minutes | Serves: 4
Ingredients
For the Stir-Fry:
- 1 pound ground beef
- 2 cups broccoli florets
- 1 red bell pepper, sliced
- 1 cup snap peas or snow peas
- 1 medium zucchini, halved and sliced
- 4 cloves garlic, minced
- 1 tablespoon fresh ginger, minced
- 3 tablespoons vegetable oil, divided
For the Sauce:
- ¼ cup soy sauce
- 2 tablespoons oyster sauce
- 1 tablespoon rice vinegar
- 1 tablespoon honey or brown sugar
- 1 teaspoon sesame oil
- 1 teaspoon cornstarch
- ¼ cup water or beef broth
- Red pepper flakes to taste
For Serving:
- 4 cups cooked rice or noodles
- Sesame seeds
- Sliced green onions
Step-by-Step Instructions
- Make the sauce. In a small bowl, whisk together the soy sauce, oyster sauce, rice vinegar, honey, sesame oil, cornstarch, water, and red pepper flakes until smooth. The cornstarch will thicken the sauce as it cooks. Set aside.
- Prep all vegetables. Cut all vegetables into similar-sized pieces for even cooking. Have everything prepped and within reach before you start cooking—stir-frying moves fast and there’s no time to stop and chop.
- Cook the beef. Heat 1 tablespoon of oil in a large wok or skillet over high heat until smoking. Add the ground beef and cook, breaking into small crumbles, until browned and crispy in spots, about 4-5 minutes. Transfer to a plate.
- Cook the vegetables in batches. Add another tablespoon of oil to the wok. Add the broccoli and cook for 2 minutes. Add the bell pepper, snap peas, and zucchini. Stir-fry for 2-3 more minutes until the vegetables are crisp-tender and brightly colored. Don’t overcook—they should still have a slight crunch.
- Add aromatics. Push the vegetables to the sides of the wok. Add the remaining tablespoon of oil to the center. Add the garlic and ginger and cook for 30 seconds until very fragrant. Toss with the vegetables.
- Combine and add sauce. Return the beef to the wok. Give the sauce a stir (the cornstarch settles) and pour it over everything. Toss and stir until the sauce thickens and coats the beef and vegetables evenly, about 1-2 minutes.
- Serve immediately. Serve the stir-fry hot over steamed rice or noodles. Garnish with sesame seeds and sliced green onions. Stir-fries are best eaten right away while the vegetables are still crisp.
Pro Tips
- High heat is essential—if your wok isn’t smoking hot, you’re steaming, not stir-frying.
- Don’t overcrowd the wok—cook in batches if necessary for proper browning.
- Prep everything before you start cooking—mise en place is critical for stir-fries.
- Swap vegetables based on what you have—mushrooms, cabbage, carrots, and bok choy all work well.
Ring in the New Year with Delicious Home Cooking
These ten ground beef recipes prove that satisfying, impressive meals don’t require expensive ingredients or complicated techniques. From the classic comfort of meatballs and mashed potatoes to the global flavors of Korean beef bowls and Asian lettuce wraps, ground beef adapts to whatever you’re craving.
As you head into the new year, remember that cooking at home is one of the simplest ways to take care of yourself and the people you love. These recipes are designed to be approachable enough for busy weeknights but special enough for celebrations. Many can be made ahead, frozen for later, or easily doubled to feed a crowd.
Whether you’re hosting a New Year’s Day feast, meal prepping for a healthier January, or simply looking for reliable recipes to add to your rotation, these ground beef dishes will serve you well. Pick one that sounds good, gather your ingredients, and make something delicious.
Here’s to a year full of great meals and the people who share them with you. Happy New Year!