
Have you ever found yourself rushing to prepare a meal but dreading the long wait for the oven to preheat? I’ve been there too. One evening, after a hectic day, I craved something warm and wholesome but didn’t have the time to bake. That’s when I discovered the magic of using a microwave to cook a sweet potato. In just about five minutes, I had a tender, flavorful dish ready to enjoy.
This method is a game-changer for anyone with a busy schedule. It’s quick, easy, and requires minimal effort. Plus, the results are surprisingly similar to traditional baking. Whether you’re looking for a fast side dish or a base for a hearty meal, this technique delivers every time.
What I love most is how versatile it is. You can enjoy it plain or dress it up with your favorite toppings. The interior stays light and fluffy, while the skin can be as crisp as you like. It’s a simple yet satisfying way to incorporate healthy eating into your routine without the hassle.
Key Takeaways
- This method is perfect for busy lifestyles, ready in just about five minutes.
- It’s a healthy alternative that skips the lengthy oven preheating process.
- The dish turns out tender and flavorful, similar to traditional baking.
- It’s versatile and can be customized with your favorite toppings.
- Even beginners can confidently make this with minimal equipment and ingredients.

Recipe Overview
Microwave Sweet Potatoes are a quick and easy way to enjoy a soft, naturally sweet, and nutritious side dish in just minutes. Cooking sweet potatoes in the microwave produces a tender interior similar to oven-baked sweet potatoes but in a fraction of the time. This method is perfect for busy weeknights, quick lunches, or healthy meal prep.
Prep Time
2 minutes
Cook Time
5–8 minutes
Total Time
7–10 minutes
Servings
1 serving
Cuisine
American
Difficulty
Easy
Ingredients
Main Ingredients
- 1 medium sweet potato
- 1 teaspoon butter (optional)
- Pinch of salt
Optional Toppings
- Brown sugar
- Cinnamon
- Maple syrup
- Honey
- Sour cream
- Shredded cheese
- Greek yogurt
Equipment Needed
Kitchen Tools
- Microwave-safe plate
- Fork
- Knife (optional)
- Paper towel
Instructions
Step 1: Wash the Sweet Potato
Rinse the sweet potato thoroughly under running water to remove any dirt. Scrub the skin if needed and pat it dry.
Step 2: Pierce the Potato
Use a fork to poke 5–6 holes around the sweet potato. This allows steam to escape while cooking and prevents the potato from bursting.
Step 3: Prepare for Microwaving
Place the sweet potato on a microwave-safe plate. You can wrap it in a damp paper towel to help keep the potato moist while cooking.
Step 4: Microwave the Sweet Potato
Microwave the sweet potato on high for 5 minutes.
Carefully flip the potato and microwave for an additional 2–3 minutes, depending on the size of the potato.
Step 5: Check for Doneness
Insert a fork or knife into the center of the potato. If it slides in easily, the sweet potato is fully cooked. If not, microwave in 1-minute intervals until tender.
Step 6: Serve
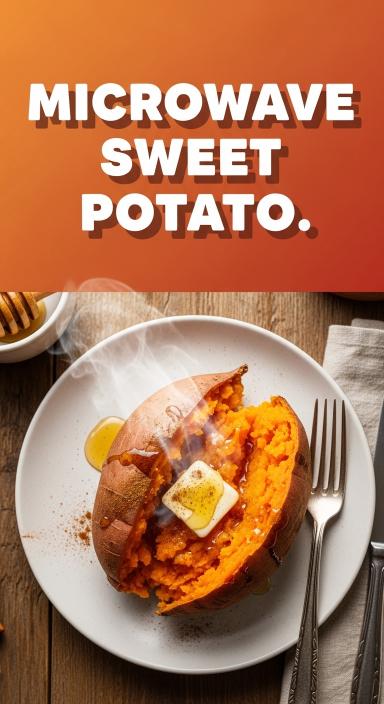
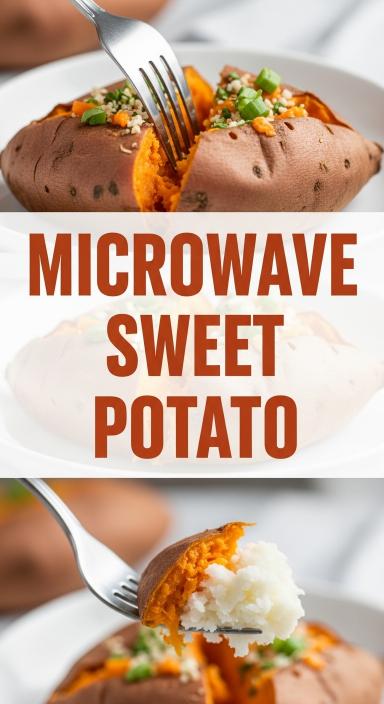
Allow the sweet potato to cool for about 1–2 minutes. Slice it open lengthwise and fluff the inside with a fork.
Add butter, salt, and your favorite toppings before serving.
Serving Suggestions
Sweet Topping Ideas
Sweet potatoes are delicious with:
- Brown sugar and butter
- Maple syrup and cinnamon
- Honey and chopped nuts
Savory Topping Ideas
Try these savory options:
- Shredded cheese and sour cream
- Greek yogurt and chives
- Black beans and avocado
Pro Tips
Choose Even-Sized Potatoes
Medium-sized sweet potatoes cook more evenly in the microwave.
Rotate for Even Cooking
Flipping the potato halfway through cooking helps prevent uneven heating.
Crisp the Skin (Optional)
If you want crispy skin, microwave the potato first and then place it in a 400°F oven for 5–10 minutes.
Storage
Refrigerator
Store leftover cooked sweet potatoes in an airtight container for up to 4 days.
Freezer
Cooked sweet potatoes can be frozen for up to 3 months.
Introduction: My Journey with Microwave Sweet Potato Recipe
One busy evening, I stumbled upon a quick cooking method that changed my meal prep game. I was craving something warm and wholesome but didn’t have the time for traditional baking. That’s when I discovered how a simple kitchen tool could transform a humble vegetable into a gourmet side.
My journey began with experimentation. I tried different techniques to achieve the perfect texture and flavor. Choosing the right sweet potato was crucial. I learned that minimal prep work, like using a knife to pierce the skin, made the process reliable and efficient.
What amazed me most was how this method saved time without compromising on taste. The results were tender, flavorful, and nutritious. My coworkers and family were equally impressed by the ease and flavor of this dish.
Over time, I refined my technique with a few key tips. For example, adjusting the cooking time based on the size of the vegetable ensured consistent results. This method became a staple in my kitchen, proving that a quick meal can still be wholesome and delicious.
Here’s a quick comparison of traditional baking vs. this method:
| Method | Time | Prep Work | Results |
|---|---|---|---|
| Traditional Baking | 45-60 minutes | Preheating required | Fluffy and tender |
| Microwave Method | 5-10 minutes | Minimal prep | Fluffy and tender |
This method is perfect for anyone with a busy schedule. It’s quick, easy, and delivers consistent results every time. Whether you’re new to cooking or a seasoned pro, this technique is worth trying.
Why the Microwave is a Game-Changer for Sweet Potatoes
Busy days call for smart kitchen hacks, and the microwave delivers. It’s a tool that drastically cuts down cooking time, making it perfect for quick, healthy meals. Unlike traditional baking, which can take up to an hour, this method gets the job done in just a few minutes.
One of the biggest advantages is how it retains natural moisture. The microwave effectively steams the potato from within, ensuring a tender and fluffy interior. This process preserves both flavor and nutrients, making it a healthier option for those on the go.
Using this appliance is also incredibly practical. It’s a common household tool, so there’s no need for special equipment. With just a few minutes, you can have a nutrient-packed side dish ready to serve. It’s ideal for impromptu meals or when you’re short on time.
“The microwave is a lifesaver for quick, healthy meals. It’s fast, efficient, and delivers consistent results every time.”
Here’s a quick comparison of the microwave method vs. traditional baking:
| Method | Time | Moisture Retention | Convenience |
|---|---|---|---|
| Microwave | 5-10 minutes | High | Very convenient |
| Traditional Baking | 45-60 minutes | Moderate | Less convenient |
Whether you’re a beginner or a seasoned cook, this method is worth trying. It’s a simple yet effective way to enjoy a delicious and nutritious dish without the wait.
Essential Ingredients and Tools
Preparing this meal requires just a few essentials from your kitchen. The simplicity of this dish is what makes it so appealing. With minimal effort, you can create a wholesome and flavorful meal that’s perfect for busy days.
Key Ingredients
The star of this dish is the sweet potato, known for its natural sweetness and earthy flavor. To enhance its taste, I use a small amount of butter and a pinch of salt. These ingredients work together to bring out the best in the potato without overpowering it.
What I love most is how these items are easy to find. You likely already have them in your pantry or fridge. This makes the recipe accessible for anyone, even on short notice.
Recommended Tools
You don’t need fancy equipment for this recipe. A simple fork is all you need to pierce the skin, allowing steam to escape during cooking. I also recommend using a microwave-safe plate to ensure safety and efficiency.
These tools are basic but effective. They make the process quick and hassle-free, perfect for those who want a nutritious meal without spending too much time in the kitchen.
| Item | Purpose |
|---|---|
| Fork | Pierce the skin for even cooking |
| Microwave-safe plate | Ensure safe and efficient cooking |
This method is designed to be straightforward and healthy. With just a scrub, a few piercings, and a short burst of cooking time, you’ll have a delicious dish ready in minutes. Plus, the lack of oil or complicated tools keeps it simple and nutritious.
Step-by-Step Instructions for the Perfect Sweet Potato
Cooking a quick, nutritious meal doesn’t have to be complicated or time-consuming. With a few simple steps, you can create a delicious dish that’s both healthy and satisfying. Here’s how to make it happen.
Prepping and Piercing the Sweet Potato
Start by thoroughly scrubbing the potato under running water. This removes any dirt or debris. Pat it dry with a clean towel to ensure even cooking. Next, use a fork to pierce the skin 3-4 times. This step is crucial as it allows steam to escape during cooking, preventing any unwanted explosions.
Place the potato on a microwave-safe plate. If you prefer a softer skin, you can loosely cover it with a damp paper towel. This helps retain moisture and ensures a tender result.
Microwaving Guidelines and Timing
Set your microwave to high power. For a medium-sized potato, start with 4-5 minutes. Cooking time may vary depending on the size, so adjust in 30-second increments if needed. Always check the center with a knife to ensure it’s soft and fork-tender.
Safety is key. Use proper utensils and avoid overheating. Once done, let it sit for a minute before handling. This allows the heat to distribute evenly, giving you the perfect texture.
These clear, step-by-step instructions make it easy for even beginner cooks to achieve great results. Enjoy your quick, wholesome meal without the hassle!
Microwave sweet potato Recipe: My Proven Method
Mastering the art of adjusting cook time ensures consistent results every time. Over the years, I’ve fine-tuned my approach to guarantee a perfectly cooked sweet potato, regardless of its size. Here’s how I do it.
Adjusting Cook Time for Different Sizes
The size of the potato plays a crucial role in determining the cook time. For a medium-sized one, I start with 5 minutes on high power. Larger ones may need an additional 1-2 minutes, while smaller ones can be ready in as little as 3-4 minutes. I always check the center with a fork to ensure it’s tender and fully cooked.
- Small: 3-4 minutes
- Medium: 5 minutes
- Large: 6-7 minutes
If your microwave wattage differs from the standard 1,000 watts, you may need to tweak the timing. Lower wattages may require longer cook times, while higher ones might need less. I’ve found that testing with 30-second intervals helps fine-tune the process.
Consistency is key. By adjusting the cook time based on size and wattage, you’ll achieve that perfect fluffy texture every time. Don’t forget to let it rest for a minute after cooking to allow the heat to distribute evenly.
“Precision in timing transforms a simple dish into a culinary masterpiece.”
This method has never failed me, and I’m confident it will work for you too. Whether you’re cooking for one or preparing a quick side dish, these adjustments ensure a delicious result every time.

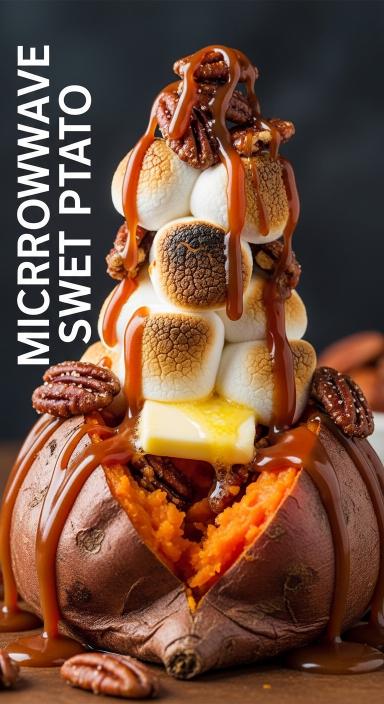
Creative Toppings and Flavor Variations
Looking for ways to elevate your dish? Toppings can make all the difference. Whether you prefer savory or sweet, a few creative additions can transform a simple meal into something extraordinary. Here are some of my favorite ideas to inspire your next creation.
Savory Options
For a savory twist, I love using a pat of butter with a sprinkle of salt and pepper. This classic combination enhances the natural flavors without overpowering them. Another favorite is adding a scoop of chickpeas for extra protein and texture.
If you’re feeling adventurous, try taco-inspired fillings like black beans, salsa, and a dollop of sour cream. These toppings turn your dish into a hearty meal that’s both satisfying and nutritious.
Sweet Options
For those with a sweet tooth, a drizzle of honey or maple syrup works wonders. Add a dash of cinnamon for a warm, comforting flavor. This combination is perfect for breakfast or dessert.
Another option is a sprinkle of cinnamon sugar for a touch of sweetness. Pair it with a handful of nuts or dried fruit for added crunch and flavor. These toppings make your dish feel indulgent while keeping it healthy.
| Topping Type | Ingredients | Best For |
|---|---|---|
| Savory | Butter, salt, pepper, chickpeas | Lunch or dinner |
| Sweet | Honey, maple syrup, cinnamon | Breakfast or dessert |
Experimenting with different toppings is a great way to make this dish your own. Whether you prefer savory or sweet, the possibilities are endless. Try mixing and matching to find your perfect combination!
Exploring Additional Cooking Variations
Ever wondered how to add a crispy twist to your quick-cooked meals? Combining the speed of the microwave with the texture-enhancing power of an oven or air fryer can take your dish to the next level. This hybrid method is perfect for those who love a bit of crunch but still want to save time.
Combining Microwave with Oven or Air Fryer Techniques
Start by cooking your sweet potato in the microwave. This ensures the inside stays tender and fluffy. Once it’s nearly done, transfer it to a preheated oven or air fryer. A quick 5-10 minutes at 400°F will crisp up the skin beautifully.
For an extra touch, lightly brush the skin with olive oil before crisping. This step adds flavor and helps achieve that perfect golden texture. The result? A dish that’s both quick and satisfying, with a delightful contrast between the soft interior and crispy exterior.
“Combining methods gives you the best of both worlds—speed and texture.”
Here’s why this method works so well:
- Speed: The microwave cuts down cooking time significantly.
- Texture: The oven or air fryer adds a satisfying crunch.
- Versatility: You can adjust the level of crispiness to your liking.
This approach is optional but highly recommended for special occasions or when you’re craving something extra. Whether you’re serving it as a side or a main dish, this technique ensures a memorable meal every time.
Tips for Achieving a Fluffy, Tender Texture
Achieving the perfect texture for your dish is easier than you think. The secret lies in retaining moisture during the cooking process. With a few simple techniques, you can create a meal that’s soft, fluffy, and full of flavor.
Moisture Retention Techniques
One of the best ways to lock in moisture is by lightly wrapping the sweet potato in a damp paper towel. This prevents dryness and ensures a tender interior. The steam generated inside the microwave helps cook the potato evenly while preserving its natural moisture.
Another tip is to avoid overcooking. Checking the potato at regular intervals ensures it stays soft and fluffy. For a medium-sized one, start with 4-5 minutes and adjust as needed. Letting it rest for a minute after cooking allows the heat to distribute evenly.
- Wrap the potato in a damp paper towel to retain moisture.
- Check the potato every minute to prevent overcooking.
- Let it rest after cooking for even heat distribution.
These techniques have helped me achieve restaurant-quality results at home. By balancing cook time and moisture retention, you can create a dish that’s both delicious and nutritious. Whether you’re cooking for one or preparing a quick side, these tips ensure a perfect outcome every time.
Storing and Reheating Leftovers
Leftovers don’t have to be boring—with the right storage and reheating techniques, they can taste just as good as fresh. Whether you’ve made extra sweet potatoes or want to save time for later meals, these tips will help you preserve flavor and texture.
Proper Storage Methods
To keep your dish fresh, store it in an airtight container. This prevents moisture loss and keeps the potato from absorbing odors in the fridge. I’ve found that leftovers stay fresh for 3-5 days when stored properly.
For longer storage, you can freeze them. Wrap the potato tightly in plastic wrap or aluminum foil before placing it in a freezer-safe bag. This method works well for up to 3 months.
Reheating Instructions
When it’s time to reheat, the microwave is your best friend. Use 30-second increments to avoid overcooking. This ensures the potato stays tender and doesn’t dry out.
For a crispier texture, use a preheated oven or air fryer. Set the temperature to 350°F and heat for 5-10 minutes. This method is perfect if you want to revive the dish with a bit of crunch.
- Store in an airtight container to maximize freshness.
- Reheat in the microwave in short intervals for even heating.
- Use the oven or air fryer for a crispy finish.
With these tips, your leftovers will taste just as delicious as the first time. Plus, you can get creative by adding new toppings like a sprinkle of salt and pepper or a drizzle of honey for a fresh twist.
Troubleshooting and Best Practices
Ever faced a dish that didn’t turn out as expected? Let’s fix that. Cooking can sometimes feel like a guessing game, but with a few simple tips, you can achieve consistent, delicious results every time. Whether it’s uneven cooking or a soggy texture, I’ve got you covered.
Preventing Common Pitfalls
One of the most common issues is uneven cooking. To avoid this, make sure to pierce the skin with a fork evenly. This allows steam to escape and ensures thorough cooking. Spacing the potato properly on the plate also helps heat distribute evenly.
Another challenge is a tough skin or undercooked center. If your microwave has a lower wattage, adjust the cook time by adding 1-2 minutes. Always check the center with a fork to ensure it’s tender before serving.
Perfecting the Skin Crisping
For those who love a crispy skin, try this trick: after microwaving, transfer the potato to a preheated oven or air fryer for 5-10 minutes. Lightly brush the skin with olive oil for extra flavor and crunch. This method combines speed with texture, giving you the best of both worlds.
“Small adjustments can transform a good dish into a great one.”
| Issue | Solution |
|---|---|
| Uneven Cooking | Pierce skin evenly and space properly on the plate |
| Undercooked Center | Adjust cook time based on microwave wattage |
| Soggy Skin | Finish in the oven or air fryer for crispiness |
By combining the right ingredients and techniques, you can create a dish that’s both delicious and consistent. Remember, small tweaks can make a big difference. Happy cooking!
Conclusion
Discovering this quick cooking method has been a game-changer for my busy schedule. It’s a simple and efficient way to prepare a nutritious meal in just minutes. Over time, I’ve refined my technique, ensuring consistent results every time.
This method is incredibly versatile. You can customize it with your favorite toppings, from savory options like salt and pepper to sweet additions like cinnamon. Even leftovers stay delicious when stored and reheated properly.
Understanding cook time and ingredient quality is key to success. Whether you’re new to cooking or a seasoned pro, this approach is worth trying. It’s a reliable way to enjoy a wholesome dish without spending hours in the kitchen.
I encourage you to experiment and make it your own. Share your feedback and let me know how it turns out. Happy cooking!