I remember the first time I tried making this dish at home. It was a chilly evening, and I wanted to create something special for dinner. I had heard about a classic recipe that combines tender meat with a rich, flavorful filling. The idea of biting into a crispy exterior to reveal a burst of herb-infused butter sounded irresistible.
Using boneless, skinless chicken breast, I carefully pounded it to an even thickness. This step ensures the meat cooks evenly and stays juicy. The filling, made with fresh butter and herbs, added a luxurious touch. I coated the breast in a light breading and fried it to golden perfection. The result was a dish that felt both comforting and elegant.
This recipe is more than just a meal; it’s a celebration of classic techniques and high-quality ingredients. Whether you’re cooking for a special occasion or a weeknight dinner, this dish is sure to impress. Join me as I share the step-by-step process to recreate this timeless favorite in your own kitchen.

Key Takeaways
- Pound the chicken breast evenly for consistent cooking.
- Use fresh butter and herbs for a rich, flavorful filling.
- Choose the right oil for a perfectly crispy exterior.
- Follow trusted techniques to ensure success every time.
- This dish is perfect for both special occasions and weeknight dinners.
Recipe Overview
Chicken Kiev is a classic dish featuring tender chicken breasts stuffed with a rich garlic herb butter, then breaded and fried or baked until golden and crispy. When cut open, the melted butter creates a delicious, flavorful sauce inside the chicken. This elegant dish is perfect for special dinners while still being simple enough to prepare at home.
Prep Time
25 minutes
Chill Time
30 minutes
Cook Time
20 minutes
Total Time
1 hour 15 minutes
Servings
4 servings
Cuisine
Eastern European / Ukrainian-inspired
Difficulty
Medium
Ingredients
For the Garlic Butter
- ½ cup unsalted butter, softened
- 3 cloves garlic, minced
- 2 tablespoons fresh parsley, chopped
- ½ teaspoon salt
- ¼ teaspoon black pepper
For the Chicken
- 4 boneless skinless chicken breasts
- Salt and black pepper to taste
For Breading
- 1 cup all-purpose flour
- 2 large eggs
- 1 tablespoon milk
- 1½ cups breadcrumbs (panko preferred)
For Cooking
- Vegetable oil for frying (or use baking method)
Equipment Needed
Kitchen Tools
- Mixing bowl
- Plastic wrap
- Meat mallet or rolling pin
- Knife
- Shallow bowls
- Skillet or baking tray
- Tongs
- Paper towels
Instructions
Step 1: Prepare the Garlic Butter
In a small bowl combine the softened butter, minced garlic, parsley, salt, and black pepper. Mix until smooth.
Shape the butter into a log using plastic wrap and refrigerate for 30 minutes until firm.
Step 2: Prepare the Chicken
Place each chicken breast between plastic wrap and pound to about ½ inch thickness.
Season both sides with salt and black pepper.
Step 3: Stuff the Chicken
Cut the chilled butter into 4 pieces.
Place one piece of garlic butter in the center of each chicken breast.
Fold the sides over the butter and roll tightly into a log shape, sealing the edges well.
Step 4: Chill the Chicken
Place the stuffed chicken in the refrigerator for 20–30 minutes. This helps keep the butter inside during cooking.
Step 5: Bread the Chicken
Set up three bowls:
- One with flour
- One with beaten eggs and milk
- One with breadcrumbs
Coat each chicken roll in flour, then dip into the egg mixture, and finally coat with breadcrumbs.
Step 6: Cook the Chicken
Frying Method
Heat oil in a skillet over medium heat.
Fry the chicken for 4–5 minutes per side until golden brown.
Transfer to a baking dish and bake at 350°F (175°C) for 10–15 minutes until fully cooked.
Baking Method
Preheat oven to 375°F (190°C).
Place breaded chicken on a baking sheet and lightly brush with oil.
Bake for 25–30 minutes until golden and cooked through.
Step 7: Serve
Let the chicken rest for 5 minutes before slicing.
Serve whole or sliced to reveal the melted garlic butter inside.
Serving Suggestions
Best Ways to Serve
Chicken Kiev is best served hot so the butter inside remains melted.
Side Dish Ideas
It pairs well with:
- Mashed potatoes
- Steamed vegetables
- Rice or pilaf
- Green beans
- Fresh salad
Pro Tips
Seal the Chicken Well
Make sure the chicken is tightly rolled to prevent the butter from leaking out.
Chill Before Cooking
Chilling helps the butter stay solid during cooking.
Use Panko Breadcrumbs
Panko creates a crispier coating compared to regular breadcrumbs.
Storage and Reheating
Refrigerator
Store leftovers in an airtight container for up to 3 days.
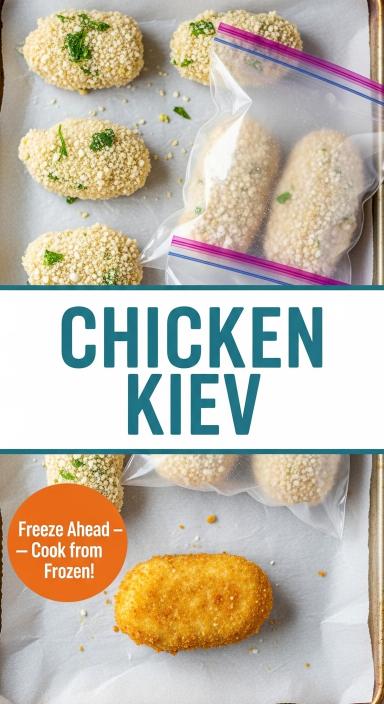
Freezer
Freeze uncooked or cooked chicken Kiev for up to 2 months.
Reheating
Reheat in the oven at 350°F (175°C) until warmed through to maintain crispiness.

Nutrition Information (Approximate Per Serving)
Calories
480 kcal
Carbohydrates
22 g
Protein
35 g
Fat
28 g
Sugar
1 g
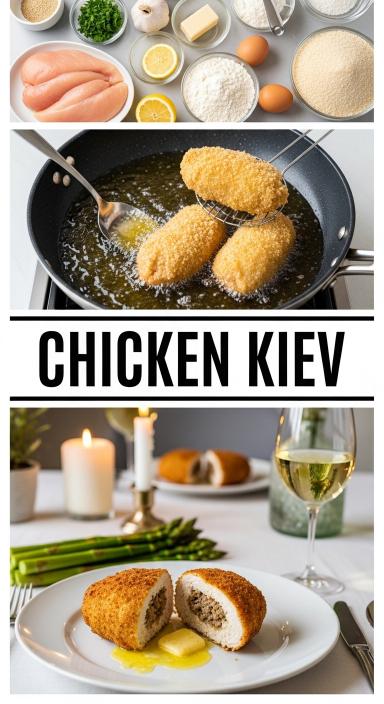
Ingredients and Prepping Essentials
The secret to a standout dish lies in the quality of its ingredients. Fresh components make all the difference, so take a minute to ensure everything is prepped and ready. From herbs to butter, each element plays a crucial role in creating a memorable meal.
Gathering Your Fresh Ingredients
Start with fresh garlic and parsley for the filling. These herbs add a burst of flavor that’s hard to beat. Unsalted butter is a must for its rich, creamy texture. Don’t forget to grab quality flour and eggs for the breading. They ensure a crispy, golden crust every time.
Seasoning is key, so choose a good pepper. A pinch can elevate the dish, balancing the flavors perfectly. Place all ingredients in a clean bowl to keep things organized. This simple step saves time and makes the process smoother.

Tools and Preparation Tips
Having the right tools is just as important as the ingredients. A sturdy cutting board and sharp knife make prepping easier. Use a meat mallet to pound the meat evenly. This ensures it cooks uniformly and stays juicy.
Keep a bowl handy for mixing and coating. It’s a small detail that makes a big difference. Take a minute to set up your station before starting. A well-organized workspace makes the process efficient and enjoyable.
Remember, precision matters from the very first step. Whether it’s measuring flour or beating an egg, attention to detail pays off. With fresh ingredients and the right tools, you’re set for success.
Creating the Perfect Herb Butter Filling
Crafting the perfect filling is the heart of this dish. It’s where simple ingredients come together to create something extraordinary. The key is to balance flavors and ensure the butter sets just right.
Mixing Herbs and Seasoning
Start with room-temperature unsalted butter. This makes it easier to mix. Add freshly minced garlic and chopped parsley for a burst of flavor. A dash of lemon juice brightens the mix. Use about 1 cup of butter to ensure the filling is rich and creamy.
Measure each ingredient carefully. This ensures the flavors are balanced. Avoid adding too much heat during mixing. It can soften the butter too much, making it harder to work with.
Chilling and Forming the Butter Log
Once mixed, shape the butter into a log. Wrap it tightly in plastic wrap. Chill it in the fridge until firm. This step is crucial. It ensures the butter stays intact when placed inside the meat.
Here’s why this process matters:
- It transforms simple ingredients into a flavorful filling.
- Chilling helps the butter set, preventing leaks during cooking.
- Proper measuring ensures consistency in every bite.
This filling is the star of the dish. Take your time with it, and the results will be worth it.

Preparing and Pounding Your Chicken Breast
Proper preparation ensures every bite is flavorful and tender. Start by placing the meat on a clean surface. Use a meat mallet to pound it to an even thickness of about 1/4 inch. This step is crucial for even cooking and locking in juices.
Pounding for Uniform Thickness
Pounding the meat evenly is essential. It ensures all sides cook uniformly and absorb flavor deeply. I take my time here, making sure there are no thick spots. This attention to detail pays off in the final result.
Seasoning and Forming the Pocket
Next, season both sides generously with salt and pepper. This enhances the natural flavor of the meat. Carefully create a pocket in the center. It should be just the right size to hold the herb butter without leaking during cooking.
I also add a sprinkle of fresh parsley on each side. This garnish adds a fresh, balanced touch to every bite. Taking these steps methodically ensures the meat stays juicy and cooks evenly.
- Pound the meat to 1/4-inch thickness for even cooking.
- Season both sides with salt and pepper for enhanced flavor.
- Create a tight pocket to hold the filling securely.
- Garnish with parsley for a fresh, balanced finish.
Mastering the chicken kiev Recipe Breading Process
Getting the breading just right is the secret to a dish that’s both crispy and flavorful. It’s all about the technique and the right ingredients. I’ll walk you through my tried-and-true method for achieving that perfect bite every time.
Setting Up Your Breading Station
Start by setting up three shallow bowls. In the first, add a cup of flour seasoned with a tablespoon of salt pepper mix. The second bowl holds beaten eggs, and the third is filled with panko breadcrumbs. This setup keeps the process organized and efficient.
I always use panko breadcrumbs for their light, airy texture. They create a crunch that’s hard to beat. Take your time to coat each piece thoroughly. This ensures the flavor is locked in and the crust adheres perfectly.
Achieving a Crisp, Golden Crust
Dip the meat into the flour first, shaking off any excess. Next, coat it in the egg wash, letting the excess drip off. Finally, press it firmly into the breadcrumbs. This step-by-step method guarantees a uniform, golden crust.
Patience is key here. Let the breaded pieces rest for a few minutes before cooking. This helps the coating set, preventing it from falling off during frying. The result? A dish with a satisfying crunch and rich flavor in every bite.
Cooking Techniques for the Ultimate chicken kiev Experience
Mastering the cooking process is what transforms this dish into a culinary masterpiece. It’s all about combining the right techniques to achieve a golden-brown exterior and a perfectly sealed interior. Let me walk you through my tried-and-true method.
Frying for a Golden-Brown Finish
Start by heating your oil to 350°F. This temperature is key for achieving a crispy, golden crust. Carefully place the breaded pieces into the oil, ensuring they’re fully submerged. Fry until the exterior turns a rich, golden brown. This step locks in the flavor and creates that satisfying crunch.
Managing the heat is crucial. Too high, and the coating burns; too low, and it becomes soggy. I always use a thermometer to keep the oil at the perfect temperature. This attention to detail ensures consistent results every time.
Baking to Seal in the Butter
After frying, transfer the pieces to a preheated oven at 400°F. Baking ensures the herb butter inside melts evenly, enhancing the flavor profile. The heat also helps the butter sizzle, creating a rich, aromatic experience.
I’ve found that this two-step process—frying followed by baking—yields the best results. The exterior stays crispy, while the interior remains juicy and flavorful. It’s a technique that elevates the entire dish.
Earlier steps, like using plastic wrap to shape the butter and a light dip in egg wash, play a role here. They ensure the structure holds together during cooking. A final drizzle of lemon juice brightens the dish, balancing the richness of the butter.
Mastering this process has been incredibly rewarding. It’s a blend of precision and patience that results in a dish that’s both comforting and elegant. Give it a try, and you’ll see why this technique is worth the effort.
Side Dish Ideas and Serving Suggestions
Pairing the right sides with your main dish can elevate the entire meal. The rich, savory flavors of this classic dish deserve equally thoughtful accompaniments. Here are some of my favorite side dish ideas and tips to make every bite unforgettable.
Complementary Sides to Enhance Flavor
Fresh salads and hearty rice pilaf are my go-to choices. They balance the richness of the dish without overpowering it. A drizzle of extra herb juice can add brightness and tie everything together beautifully.
For a more substantial meal, roasted carrots or mashed potatoes work wonders. Their natural sweetness and creaminess complement the dish perfectly. Here’s a quick guide to my favorite pairings:
| Side Dish | Why It Works |
|---|---|
| Roasted Carrots | Adds a touch of sweetness and color. |
| Rice Pilaf | Provides a hearty, flavorful base. |
| Mashed Potatoes | Offers creamy comfort. |
| Garden Salad | Brings freshness and balance. |
When it comes to leftovers, I recommend using wrap techniques to keep the dish intact. A quick reheat in the oven ensures the flavors remain vibrant, even the next day.
Presentation matters too. Thoughtful plating with perfectly cooked sides makes every dining experience special. I love adding a sprinkle of fresh herbs or a squeeze of lemon juice for that final touch of elegance.
Balancing intense flavors with lighter, fresher components is key. It’s a simple way to make the meal feel complete and satisfying. Give these ideas a try, and you’ll see how they transform your table.
Conclusion
Every bite of this dish tells a story of careful preparation and rich flavors. The brown, crispy exterior hides a perfectly sealed pocket of herb butter, creating an unforgettable taste. Each step, from rolling the meat to coating it in bread, ensures the filling stays intact until the first cut.
After cooking, let the dish rest on a sheet. This allows the flavors, like garlic and chopped fresh herbs, to settle beautifully. Pair it with sides like seasoned rice or roasted potato for a balanced meal. The nutrition profile makes it indulgent yet wholesome.
I encourage you to try this recipe in your own pan one day. It’s a celebration of technique and flavor, rewarding you with every bite.