
There’s something almost magical about sourdough bread. That crackling crust that shatters when you slice into it. The complex, tangy flavor that commercial bread simply cannot replicate. The satisfaction of knowing that the beautiful loaf on your counter came from just three ingredients—flour, water, and salt—transformed by wild yeast and beneficial bacteria into something extraordinary.
Sourdough baking has experienced a remarkable renaissance in recent years, and for good reason. Beyond the superior flavor and texture, sourdough offers genuine health benefits: the long fermentation process breaks down gluten, making it easier to digest; it has a lower glycemic index than commercial bread; and the natural fermentation creates beneficial compounds that simply don’t exist in quickly-made breads.
But let’s be honest—sourdough has a reputation for being difficult. The timing seems complicated. The terminology is confusing. The photos on social media make it look like you need professional training to achieve those gorgeous, blistered loaves with their perfectly open crumb. Here’s the truth: sourdough is not difficult. It’s different. It requires patience rather than skill, observation rather than precision, and a willingness to work with natural processes rather than against them.
This guide will walk you through every step of making sourdough bread at home, from creating your own starter to pulling a stunning loaf from the oven. We’ll explain not just what to do, but why you’re doing it—because understanding the process makes you a better baker. By the end, you’ll have everything you need to bake bread that rivals any artisan bakery.

Understanding Sourdough: The Science Behind the Magic
Before we dive into the recipe, understanding what makes sourdough unique will help you become a more intuitive baker. Unlike commercial bread made with instant yeast, sourdough relies on a living culture of wild yeast and lactic acid bacteria. This culture—your sourdough starter—is what gives the bread its distinctive flavor, texture, and keeping qualities.
When you mix flour and water and leave it at room temperature, wild yeast from the flour and the environment begin to colonize the mixture. These yeasts consume the sugars in the flour and produce carbon dioxide (which makes the bread rise) and alcohol. Simultaneously, lactic acid bacteria produce lactic and acetic acids, which create the tangy flavor and also strengthen the gluten structure.
The fermentation in sourdough happens much more slowly than with commercial yeast—typically 4-12 hours for the bulk fermentation alone, compared to 1-2 hours for yeasted bread. This extended time allows for complex flavor development and better gluten structure. The acids produced during fermentation also act as natural preservatives, which is why sourdough stays fresh longer than commercial bread.
Temperature plays a crucial role in sourdough baking. Warmer temperatures (75-80°F) speed up fermentation and favor yeast activity, while cooler temperatures (65-70°F) slow things down and allow more acid development. Most home bakers work somewhere in between, adjusting their timeline based on their kitchen temperature. This flexibility is one of sourdough’s great advantages—you can adapt the process to fit your schedule.
Part One: Creating Your Sourdough Starter
If you already have an active sourdough starter, you can skip ahead to the bread recipe. But if you’re starting from scratch, you’ll need to create your starter first. This process takes about 7-10 days, but the starter you create will last indefinitely with proper care—many bakers maintain starters that are decades old, passed down through generations.
Creating a starter requires just two ingredients: flour and water. Whole grain flours (whole wheat or rye) work best for starting because they contain more wild yeast and nutrients than white flour. Once your starter is established, you can switch to feeding it with all-purpose flour if you prefer.
Starter Ingredients
- Whole wheat flour or rye flour (for initial creation)
- Unbleached all-purpose flour (for ongoing feeding)
- Filtered or bottled water (chlorine can inhibit yeast growth)
- A glass jar or container (at least 1-quart capacity)
- A kitchen scale (highly recommended for accuracy)
Creating Your Starter: Day-by-Day Instructions
Day 1: The Beginning
- Combine flour and water. In a clean glass jar, mix 60 grams (about ½ cup) of whole wheat or rye flour with 60 grams (¼ cup) of room temperature water. Stir vigorously until no dry flour remains—the mixture should have a thick, paste-like consistency similar to thick pancake batter.
- Cover loosely. Place a loose lid, cloth, or plastic wrap with holes poked in it over the jar. The starter needs to breathe but also needs protection from debris and excessive drying. Don’t seal it airtight—gas needs to escape.
- Find a warm spot. Place the jar in a warm location, ideally 75-80°F. On top of the refrigerator, near (but not on) a heating vent, or in an oven with just the light on are all good options. Avoid direct sunlight. Let it rest for 24 hours without disturbing it.
Day 2: First Observation
Check your starter. You may or may not see activity—small bubbles or a slight increase in volume. Don’t be discouraged if nothing seems to be happening yet. The wild yeast and bacteria are just beginning to establish themselves. Today, simply observe. No feeding required.
Day 3: First Feeding
By day 3, you should see some bubbles and possibly some rise. The starter might smell a bit funky or even unpleasant—this is normal. Bacteria are establishing themselves, and the smell will improve as the culture matures. Discard half of your starter (about 60 grams), then add 60 grams of flour and 60 grams of water. Stir well, cover, and return to your warm spot.
Days 4-6: Daily Feedings
Continue feeding once daily: discard half, add 60 grams flour and 60 grams water, stir, cover, rest. You can switch to all-purpose flour now if you prefer. You should see increasing activity—more bubbles, more rise, and the smell should become more pleasant and tangy. Mark the jar with a rubber band to track the rise.
Days 7-10: Establishing Strength
Your starter should now be reliably doubling in size within 4-8 hours of feeding. The smell should be pleasantly sour and yeasty—like beer or wine. When it consistently doubles and then falls back down, it’s ready to use for baking. If it’s not quite there yet, continue daily feedings for a few more days. Every starter develops at its own pace.
The Float Test
To confirm your starter is ready for baking, perform the float test: drop a small spoonful of starter into a glass of room temperature water. If it floats, your starter is active and buoyant enough to leaven bread. If it sinks, feed it and wait until it’s at peak activity (usually 4-8 hours after feeding) before testing again. The float test should be done when your starter is at its peak—fully risen but not yet collapsed.

Maintaining Your Starter Long-Term
Once established, your starter is surprisingly resilient. If you bake frequently (several times a week), keep your starter at room temperature and feed it daily. If you bake less often, store your starter in the refrigerator, where it will slow down dramatically and only need feeding once a week.
Room temperature storage: Feed once daily with equal parts flour and water by weight. Discard or use the excess before feeding.
Refrigerator storage: Feed once a week. Remove from fridge, discard half, feed, let sit at room temperature for 2-4 hours until you see some activity, then return to the refrigerator.
Before baking: If your starter has been refrigerated, take it out 12-24 hours before you plan to mix your dough. Feed it and let it come to peak activity at room temperature before using.
Part Two: The Sourdough Bread Recipe
Now for the main event—the bread itself. This recipe produces one large round loaf (called a boule) with a crispy, caramelized crust and an open, chewy crumb. The timeline spans about 24 hours from start to finish, but most of that time is hands-off fermentation. Your actual active time is less than an hour total.
Total Time: 24-30 hours | Active Time: 45-60 minutes | Makes: 1 large loaf
Ingredients
For the Levain (Preferment):
- 25 grams active sourdough starter
- 50 grams bread flour
- 50 grams whole wheat flour
- 100 grams water (room temperature)
For the Dough:
- 375 grams bread flour
- 375 grams water (90-95°F warm)
- 75 grams whole wheat flour
- 10 grams fine sea salt
- Rice flour for dusting (prevents sticking better than regular flour)
Equipment You’ll Need
- Kitchen scale (essential for consistent results)
- Large mixing bowl
- Bench scraper or dough scraper
- Proofing basket (banneton) or bowl lined with a floured towel
- Dutch oven (5-7 quart) with lid
- Sharp knife, razor blade, or bread lame for scoring
- Parchment paper
- Instant-read thermometer (helpful but optional)
Phase 1: Building the Levain (Night Before)
Timeline: 8-12 hours before mixing dough (typically evening before bake day)
The levain (also called leaven) is a portion of starter that’s fed and allowed to ripen specifically for your bread. Building a levain ensures you’re using your starter at peak activity and gives you control over the amount of prefermented flour in your recipe.
- Combine levain ingredients. In a clean jar or small bowl, mix 25 grams of your active starter with 50 grams bread flour, 50 grams whole wheat flour, and 100 grams room temperature water. Stir until no dry flour remains.
- Cover and rest. Cover loosely and let the levain ferment at room temperature (ideally 70-75°F) for 8-12 hours, or overnight. It’s ready when it has doubled in size, is domed on top (or just beginning to fall), and passes the float test.
- Test for readiness. The levain should smell pleasantly sour and be full of bubbles throughout. Drop a small spoonful in water—if it floats, it’s ready. If your levain has already collapsed significantly, it’s slightly overripe but still usable; your bread may just be slightly more sour.
Phase 2: Mixing the Dough (Morning of Bake Day)
Timeline: About 30 minutes active time
Step 1: Autolyse
Autolyse is a rest period where flour and water are mixed and left to hydrate before adding the levain and salt. This step makes the dough easier to work with and improves the final texture.
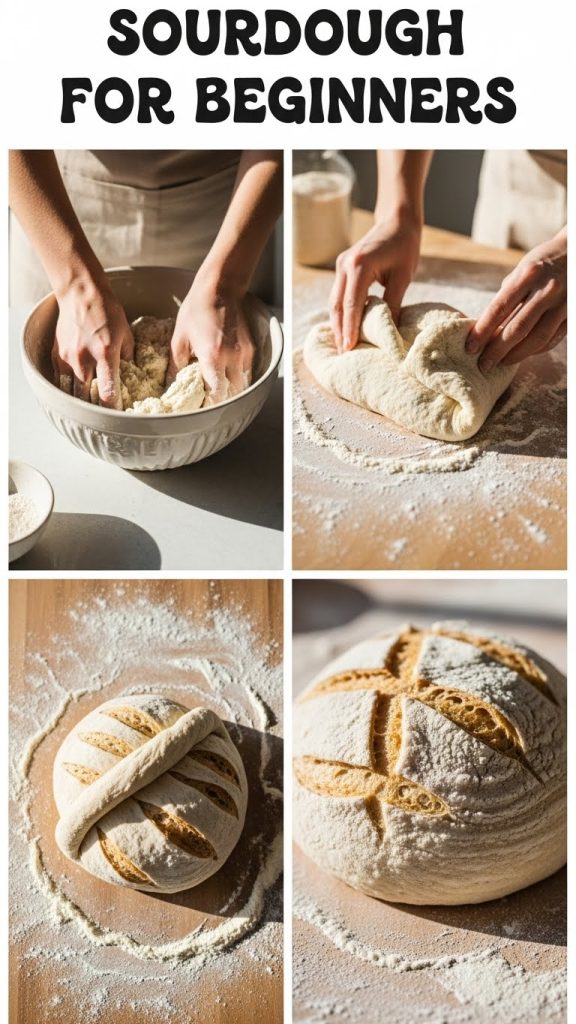
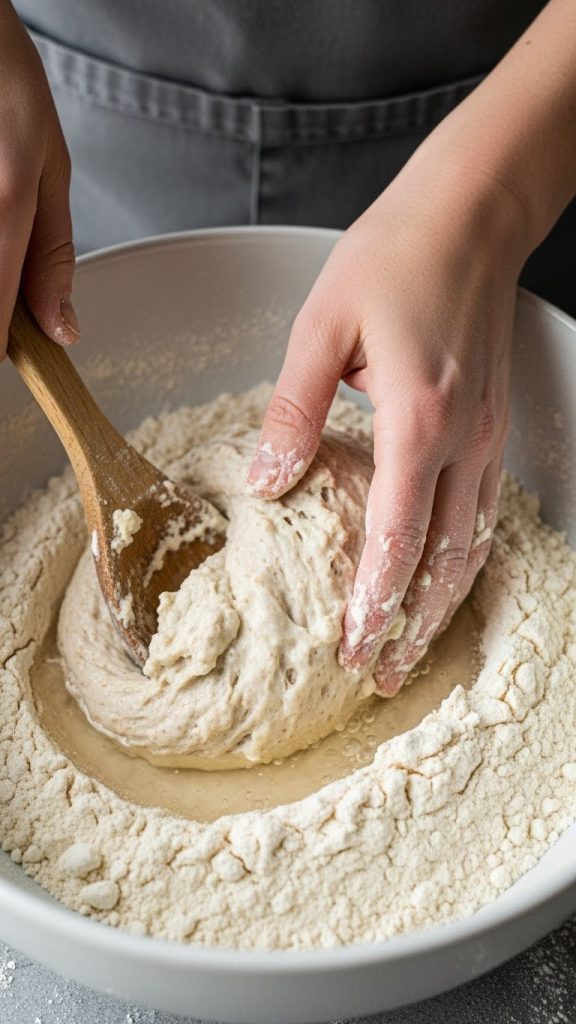
- Mix flour and water. In a large mixing bowl, combine 375 grams bread flour and 75 grams whole wheat flour. Add 375 grams of warm water (90-95°F). Using your hand or a spatula, mix until no dry flour remains. The dough will be shaggy and sticky—this is correct.
- Cover and rest. Cover the bowl with a damp towel or plastic wrap and let it rest for 30-60 minutes. During this time, the flour will fully hydrate and gluten will begin to develop on its own. The dough will become noticeably smoother and more cohesive.
Step 2: Add Levain and Salt
- Add the levain. Spread the ripe levain over the top of the dough. Using wet hands (to prevent sticking), squeeze the levain into the dough, folding the dough over itself repeatedly. Work the levain through until it’s evenly distributed—this takes 2-3 minutes of squeezing and folding.
- Add the salt. Sprinkle the 10 grams of salt over the dough. Using the same squeezing and folding technique, incorporate the salt thoroughly. The dough will tighten up noticeably as the salt is added—this is the salt strengthening the gluten.
- Perform a window pane test (optional). To check gluten development, wet your hands and stretch a small piece of dough gently. If you can stretch it thin enough to see light through it without it tearing, your gluten is well developed. If it tears easily, continue mixing for another minute or two.
Phase 3: Bulk Fermentation
Timeline: 4-6 hours (varies based on temperature)
Bulk fermentation is where the magic happens. During this phase, the wild yeast and bacteria in your levain ferment the dough, producing carbon dioxide that makes it rise and organic acids that develop flavor. You’ll help the process along by performing a series of stretch and folds.
Stretch and Folds
Stretch and folds strengthen the gluten and redistribute the yeast and temperature throughout the dough. They’re gentle—you’re not kneading, just stretching the dough up and folding it over itself.
- Perform the first set of stretch and folds. About 30 minutes after adding the salt, wet your hand and slide it down one side of the bowl, under the dough. Grab the dough from the bottom, stretch it up as high as it will go without tearing, and fold it over the top toward the opposite side. Rotate the bowl 90 degrees and repeat. Do this 4 times total (once on each side). The dough will feel tighter and more structured after each fold.
- Continue stretch and folds. Repeat the stretch and fold process every 30 minutes for the first 2 hours of bulk fermentation (that’s 4 sets total). After the final set, leave the dough undisturbed for the remaining fermentation time. Each set should feel easier as the gluten develops—the dough will become smoother and more elastic.
- Monitor the fermentation. Watch for signs of fermentation: the dough should increase in volume by 50-75% (not quite double), become puffy and jiggly, and show bubbles on the surface and sides. The edges should dome slightly. In a 75°F kitchen, this typically takes 4-5 hours total. Warmer kitchens will be faster; cooler kitchens will be slower.
- Know when bulk is complete. The dough is ready to shape when it has risen 50-75%, feels airy and lighter, has visible bubbles, and when you gently poke it, it slowly springs back but leaves a slight indentation. If it springs back immediately, it needs more time. If it doesn’t spring back at all, it may be slightly overproofed—shape it promptly.
Phase 4: Shaping the Loaf
Timeline: 15-20 minutes active time
Shaping creates surface tension on the dough, which helps the loaf hold its shape and rise upward rather than spreading outward during baking. Good shaping is the key to a tall, well-structured loaf.
Pre-Shape
- Turn out the dough. Lightly flour your work surface. Using a bench scraper, gently release the dough from the bowl and turn it out onto the floured surface. Try not to deflate it too much—treat it gently.
- Pre-shape into a round. Using the bench scraper and your hand, gently push the dough into a loose round shape. Use the bench scraper to drag the dough across the counter toward you—the friction creates surface tension. Rotate slightly and drag again. Don’t worry about perfection here; this is just a preliminary shape.
- Bench rest. Let the pre-shaped dough rest on the counter, uncovered, for 20-30 minutes. This relaxes the gluten and makes the final shape easier. If your kitchen is very dry, cover loosely with a towel to prevent a skin from forming.
Final Shape
- Prepare your proofing basket. Generously dust your banneton or towel-lined bowl with rice flour. Rice flour prevents sticking better than wheat flour because it doesn’t absorb moisture as readily. Be generous—better too much than having your dough stick.
- Flip and fold. Lightly flour the top of your rested dough. Using the bench scraper, flip it over so the floured side is now on the bottom (facing the counter). You’re now looking at the sticky, unfloured side.
- Create the envelope. Stretch the bottom of the dough away from you, then fold it up to the center. Stretch the top toward you, then fold it down to meet the first fold. Stretch the left side and fold it to the center, then the right side. You’ve created a package or envelope shape.
- Create final tension. Flip the dough over so the seam side is down. Using your hands cupped around the dough, drag it toward you across the counter. The friction creates surface tension. Rotate and repeat until the surface is taut and smooth. The dough should hold a nice round shape.
- Transfer to proofing basket. Pick up the shaped dough and place it seam-side up into your prepared banneton. The smooth, tensioned surface should be facing down. Dust the exposed seam side with a little more rice flour to prevent sticking.
Phase 5: Cold Proofing (Retard)
Timeline: 8-16 hours (overnight in refrigerator)
Cold proofing (also called retarding) slows down fermentation while allowing flavor to continue developing. It also makes the dough much easier to score and helps achieve better oven spring. Plus, it fits perfectly into an overnight schedule.
- Cover and refrigerate. Cover your banneton with plastic wrap, a shower cap, or place it inside a plastic bag. Transfer to the refrigerator. The dough will continue to proof slowly in the cold.
- Proof overnight. Let the dough cold proof for at least 8 hours and up to 16 hours. The longer the cold proof, the more sour the final bread will be. Most bakers find 10-14 hours to be the sweet spot for both flavor and schedule convenience.
- Test for readiness. The dough is ready to bake when it has increased in size by about 50% and springs back slowly when poked. If it springs back quickly, it needs more time. If it doesn’t spring back at all or deflates, it’s overproofed—bake it immediately and expect a denser loaf.
Phase 6: Baking
Timeline: About 50 minutes total
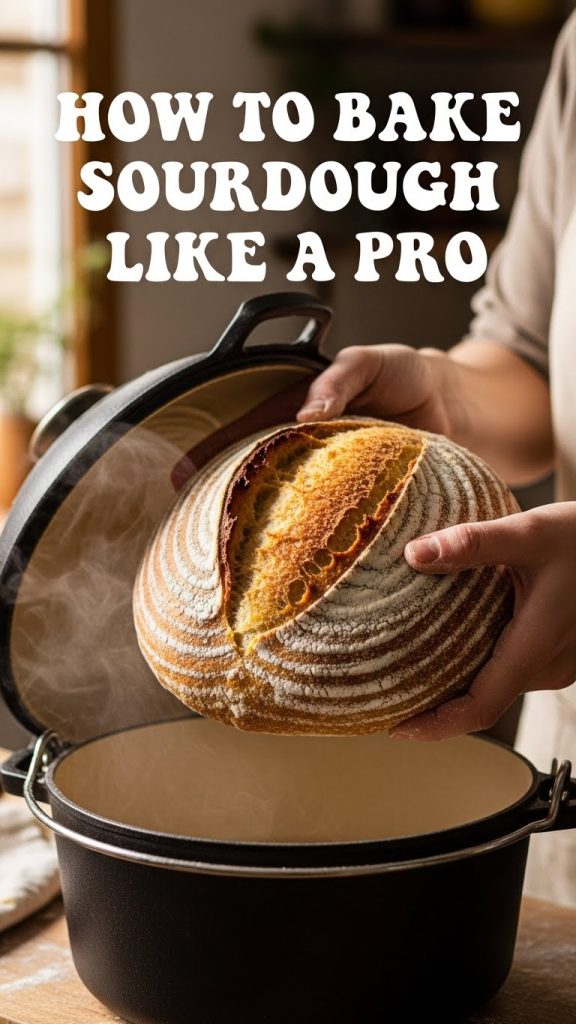
The moment of truth. Baking transforms your carefully fermented dough into crusty, aromatic bread. The Dutch oven creates a steamy environment that allows maximum oven spring and develops that characteristic sourdough crust.
Preheat
- Preheat your oven with the Dutch oven inside. Place your Dutch oven with its lid on a middle rack. Set your oven to 500°F (260°C) and preheat for at least 45-60 minutes. The Dutch oven needs to be screaming hot. This is not the time to skimp on preheating.
Score and Load
- Prepare the dough for baking. Cut a piece of parchment paper large enough to lift the dough. Remove the dough from the refrigerator. Place the parchment over the top of the banneton, then place a cutting board or flat surface over that. Flip everything over so the dough releases onto the parchment. Remove the banneton. The smooth, tensioned side of your dough should now be facing up.
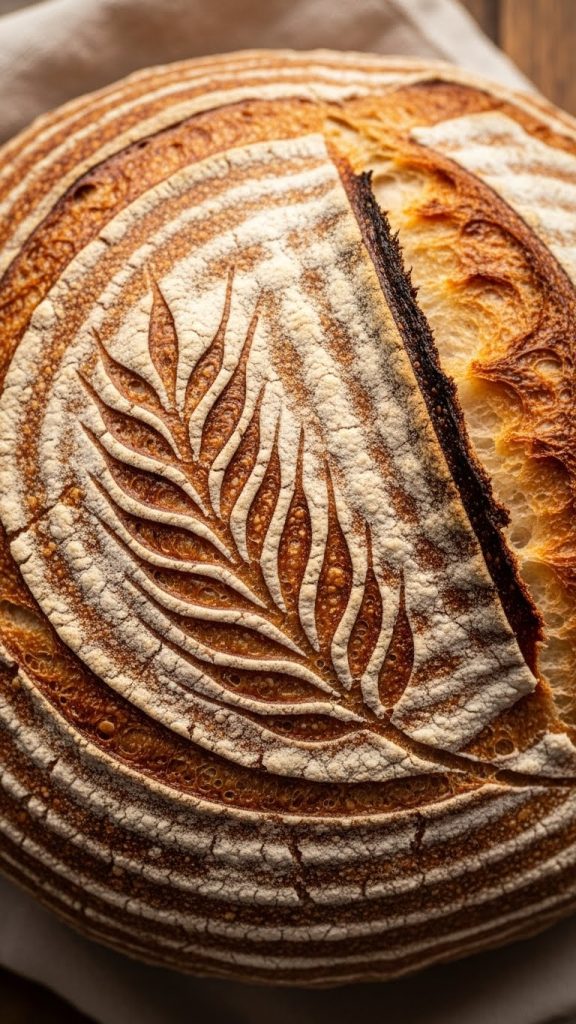
- Score the dough. Using a very sharp knife, razor blade, or bread lame held at a 30-45 degree angle, make one swift, confident cut about ½ inch deep across the top of the loaf. This is your score—it controls where the bread expands during baking. A single curved slash is classic, but you can experiment with patterns. Score quickly and decisively; hesitation causes dragging.
- Load into the Dutch oven. Carefully remove the preheated Dutch oven from the oven (it’s extremely hot—use heavy oven mitts). Remove the lid. Using the parchment as a sling, carefully lower the dough into the Dutch oven. It’s okay if the parchment crinkles; just try to center the dough. Replace the lid immediately.
Bake
- Bake covered. Place the covered Dutch oven back in the oven. Reduce temperature to 450°F (230°C). Bake for 20 minutes with the lid on. The steam trapped inside allows the crust to stay flexible while the bread expands (this is oven spring), and it promotes the gelatinization that creates a crispy, blistered crust.
- Remove the lid. After 20 minutes, carefully remove the lid. You should see a pale, expanded loaf with a dramatic ear where you scored it. Now the crust will brown and crisp.
- Bake uncovered until deeply browned. Continue baking uncovered for 25-30 more minutes until the crust is deep mahogany brown. Don’t be afraid of color—a dark crust means more flavor. The internal temperature should reach 205-210°F when fully baked. The loaf should feel light for its size and sound hollow when tapped on the bottom.
- Cool completely before cutting. This is the hardest part. Transfer the bread to a wire rack and let it cool for at least 1 hour before cutting. The bread is still baking internally as it cools, and cutting too soon results in a gummy texture. Listen for the crackling song of the crust as it cools—that’s the sound of a great loaf.
Troubleshooting Common Issues
Dense or Heavy Loaf
This usually indicates underfermentation. Your bulk fermentation may have been too short, or your starter may not have been active enough. Make sure your starter passes the float test before using it. Extend your bulk fermentation time, especially in cooler kitchens. The dough should increase by at least 50% and be visibly bubbly before shaping.
Flat Loaf That Spread Instead of Rising
This is often overproofing or weak shaping. If the dough was left too long at any stage, the gluten structure weakens and can’t support the loaf. Practice your shaping to create better surface tension. Make sure your dough isn’t too warm during bulk fermentation—warmth speeds up fermentation dramatically.
Gummy Interior
Either the bread was underbaked or you cut it before it finished cooling. Bake to an internal temperature of at least 205°F. Don’t be afraid of a dark crust. Always let the bread cool for a full hour before cutting, no matter how tempting it smells.
No Oven Spring or Ear
Oven spring depends on a properly fermented dough, a hot oven, and steam. Make sure your Dutch oven is fully preheated (45-60 minutes). Bake from cold (straight from the refrigerator) for better spring. Score confidently and at an angle. Overproofed dough won’t spring, so monitor your proof carefully.
Dough Too Sticky to Handle
High hydration doughs are naturally sticky. Use wet hands when handling the dough during bulk fermentation. Use rice flour generously when shaping. Work quickly and confidently—the more you handle sticky dough, the stickier it gets. Bench scrapers are your best friend for shaping.
Tips for Sourdough Success
- Use a kitchen scale. Baking by weight is far more accurate than volume measurements and will dramatically improve your consistency.
- Keep notes. Record your timing, temperatures, and results. This helps you adjust for your specific kitchen conditions.
- Watch the dough, not the clock. Fermentation times are guidelines. Learn to read your dough’s signs of readiness.
- Temperature matters. A few degrees can significantly change your timeline. Use a thermometer to know your dough and room temperatures.
- Start with bread flour. It has more protein than all-purpose, which makes handling easier and creates better structure.
- Be patient with your starter. A new starter may take 2-3 weeks to become reliably strong. Keep feeding it.
- Don’t fear the dark crust. A deeply browned crust has more flavor and will soften slightly as the bread rests.
- Embrace imperfection. Every loaf teaches you something. Even imperfect sourdough is delicious.
The Journey Continues
You now have everything you need to bake beautiful sourdough bread at home. But here’s the thing about sourdough—it’s not just a recipe, it’s a practice. Each loaf teaches you something new. You’ll learn to read your dough, to adjust for seasons and humidity, to feel when the gluten is developed and when the fermentation is complete.
Your first loaf may not be perfect. It might be too flat, too dense, or too pale. Bake it anyway. Eat it anyway. Learn from it and bake another. The bakers who make stunning loaves are the ones who’ve baked hundreds of imperfect ones first.
There’s a reason humans have been making sourdough bread for thousands of years. It connects us to something ancient and fundamental. When you mix flour, water, and salt and transform them into bread through the action of wild microorganisms, you’re participating in one of humanity’s oldest culinary traditions.
Now go bake some bread.